Homemade (mock) rocks & other rocks
Earth Science Unit - properties (3rd - 4th grade)
Questioning is the foundation of all learning.
The first step in rejecting not knowing is to ask, why?
Sweetland
Introduction
- Big ideas, concepts, facts, & outcomes
- Science content concepts & outcomes
- Inquiry & science process concepts
- Anticipated learnings & misconceptions
- Pedagogical overview
- Activities sequence
- Focus questions
- Materials
- Scoring guide suggestions
- Unit activity sequence
- Activity 1 - Homemade rocks observation - Observe home made rocks. Draw and record observations with explanations as to similarities and differences.
- Activity 2 - Taking apart the home made rock activity.
- Activity 3 - Separate home made rock powders with water.
- Activity 4 - Discuss different properties: such as luster, & hardness.
- Activity 5 - Measure them: can it be sanded? Paper clip scratch test.
- Activity 6 - Test for calcite
- Activity 7 - Rocks in space?
- Lab notes
- Lab note 1 - Homemade rocks observation - Observe home made rocks. Draw and record observations with explanations as to similarities and differences.
- Lab note 2 - Taking apart the home made rock activity.
- Lab note 3 - Separate home made rock powders with water.
- Lab note 4 - Discuss different properties: such as luster, & hardness.
- Lab note 5 - Measure them: can it be sanded? Paper clip scratch test.
- Lab note 6 - Test for calcite
- Lab note 7 - Rocks in space?
- Support materials
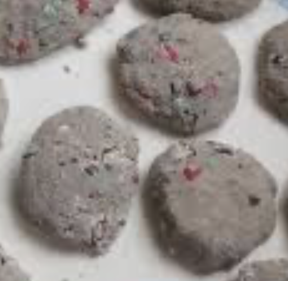
This is an Earth science plan to investigate and explore rocks: their properties, different ways to classify them, and tests geologist use to study them. Use mystery rocks homemade mock rocks) to explore how geologist investigate rocks and uses different tests to discover rock properties to explain their mineral properties, how they are formed, and classified.
This unit focuses on properties and classification. For more information on how rocks are made consult the Rock cycle unit. Together they provide information for middle level learners which you can use to meet the needs of the level of your particular learners.
This plan requires the homemade mock rocks be made a week before you use them.
Related resources:
Related study activities
- Rocks - observations and properties grades 1-2
- Soil, roots, and plants grades 3-8
- Homemade rocks - properties, tests - THIS UNIT
- Rock cycle grades 6-8
- Rock cycle - diagram
- Measurement as an observable property: linear, volume, mass, temperature, & area
Photos and materials
Planning information
Learner background information
A plan designed for learners who have prior knowledge in cause and effect, use of observations to make inferences and explanations for observable and non observable events. And social skills to work in groups.
Background information
Some or all of the following may need to be done before the first activity with the homemade rocks.
- Prepare and test the homemade (Mock) rocks.
- Review linear, area, and volume. measurement and skills as appropriate for the learners.
- Review related vocabulary.
- Consider learner group size. Pairs may be best if there are sufficient materials.
- Decide how to set up the Materials Station. Organize materials for the activity in a convenient location where one person (Getter) for each group can get the needed materials.
- Plan for Cleanup. The rocks will be taken apart and separated. The gravel and shells from the rest of the material (sand, flour and salt). Do not pour sand or other solids down the drain.
- Plan to recycle the gravel for the next batch of homemade rocks.
- The remaining material (the part they can't separate) is saved to use in the next activity rocks in water.
- Each pair of learners will fill a vial one-third full of the remaining material, label the vial by writing their names on a small piece of paper placed in the vial, and cap the vial. Plan where in the room to store these vials of mock or homemade rock material until the next activity.
- Depending on the skill the learners have with a hands lens, they may need to practice using one. Have them hold the lens in one position about 2 cm from the eye and move the rock or object they are viewing until it comes into focus.
- Plan to use the lab notes or how the learners will create their own notes.
- For visually impared learners. Homemakde (mock) rocks can be made with larger pieces of gravel and shells which might be more appropriate for younger learners. Large magnifying glasses to observe the rocks will also be better for use to low vision learners. A flexible Braille and large print meter tape is available from the FOSS Project at Lawrence Hall of Science (LHS). A tactile FOSS balance is also available.
Intended learnings & learners thinkings
Background information
Content concepts or outcomes
(Source concepts & misconceptions)
Big ideas and specific outcomes:
- Earth materials are important resources in our world. We are surrounded by earth materials. Without them we would not be able to grow and product food. and we use them for buiding materials. Many children and adults take earth materials for granted or otherwise just simply do not understand their many uses. Educated citizens are informed about their uses and how we identify their useful properties for our benefits. For example, by understanding the properties of rocks people can find beneficial ways to use them in sustainable ways.
- Observation of properties of objects are used to describe, identify, and classify objects in our world. From using words to name and describe everything in our world (hat, coat, tee shirt, dog, car, cow, house, tree, plant ... ) including rocks which are the solid mineral material that makes up the surface of the Earth or underlying the soil or oceans and on other similar planets.
Concepts and facts
Concepts and facts are described in the science content and process areas.
Outcome
Use and describe information about rocks in a scientific manner to understand their properties and uses.
Science concepts: physical, earth, life
Big ideas:
- Rocks are composed of Earth materials.
Related concepts
- Earth materials include: sand, silt, humus (leaves, plant parts, animal parts, microorganism), gravel, rocks ...
- Rocks are identified by their properties.
- Rock properties include luster, hardness, color, mass, density, crystals and if present their size,
Outcome
- Identify common properties of rocks (color, hardness, crystals, grainy, size, luster).
- Describe rocks by their properties.
- Identify rocks by common properties.
Anticipated learner thinkings & misconceptions
Rocks are common objects for many you learners who think they are very familiar with them, but they don't know that much about their properties.
- Rocks are heavy.
- Rocks are stronger because they are hard and break. Sand is weaker because you can push your way through it.
- Rocks are stronger than the forces of nature (water, wind, ice).
- Rocks can only be changed by a blow of a hammer or other powerful object.
- Rock is a hard solid material.
- Rocks are uniform inside.
- Any crystal that scratches glass is a diamond.
Inquiry, process, & cross cutting concepts & skills
Inquiry
- When I experiment I collect observations that describe how different properties change (become variables) when objects and systems interact. This helps me make claims, explain what is happening, and to predict what might happen in the future.
- Inquiry concepts
- Process concepts
- Perspective concepts
Cross cutting
Big ideas: See also Concepts & misconceptions
Scientists explore and use observation and properties to understand and explain.
Evidence, explanation, & models
Related concepts and facts
- Observation can be used to identify properties of objects.
- Objects have many properties.
- Objects can be described and compared by properties.
- Properties are size, color, shape, texture,
- Observational data and reasoning is used to explain interactions. Evidence is something that is observed and can be used to understand what is happening and make predictions about future changes.
- Properties can be used to identify and describe objects.
- Models are structures that correspond to real objects, events, or classes of
events.
- Explanations are based on observation derived from experience or experimentation and are understandable.
- Pictures or symbols represent objects.
Outcome -
- Make observations, identify properties/ characteristics and use them to describe objects.
Specific outcomes -
- Describe an object by its properties.
- Describe the term - property and provide at least two examples (color, hardness, texture, luster, crystal, mass, size, shape, temperature, amount, volume, rate, ... for rocks.
- Recognize that some properties are necessary to include when describing an object.
- Recognize that a sufficient number of properties needs to be included to describe an object.
- Recognize a unique set or properties is required to distinguish a unique object.
Systems, order, organization, & classification
How science uses properties to organize objects as similar or different and make groups with similar properties (classification).
Related concepts and facts
- Properties/ characteristics can be used to group objects.
- Objects can be grouped by similar properties/ characteristics.
- Classification systems can be changed by changing the properties/ characteristics used to group the objects.
Outcome
Group and regroup rocks based on observed properties.
Specific outcomes
- Classify objects by their similar properties or characteristics.
- Create a classification system to classify rocks.
- Modify their classification system to include additional properties
- Use their classification system to classify unfamiliar objects (rocks).
- Group and regroup rocks based on observed properties.
- Students will suggest a classification system, that operates like the one created and used for rocks, could be created and used to classify animals or plants or other things with many properties.
Other possible concepts
History of science and development of technology - perspective of science
See also Concepts & misconceptions also science, math, technology timeline
- People have practiced science and technology for a long time.
- Science develops over time.
- Science investigators such as
Scoring guides suggestions (rubric)
(scoring guide)
Top level
- Rocks are all made with different Earth materials that are distributed in random (unorganized, messy, jumbled) ways with properties that depend on the materials from which they were made. Since some Earth materials are abuntant and others are rare, some types of rocks will be abundant and others will be rare. [Glass, plastic, wood, seashells are more organized than rocks through out their entire object.] [Minerals within rocks are very organized with crystalline structures.]
- Rocks can be different depending on their color or shape.
- Rocks are made from mountain material.
- Sand is sand.
Lower level
Observation, properties, & defining / identifying objects (scoring guide)
Classification development levels summary
Top level
- Recognizes that objects are classified by properties selected according to a particular task and recognizes that objects (e.g. platypus, whale) may appear to belong in another category than what appears obvious.
- Rocks are classified by the way they are made. Earth particles pressed together, Earth particles heated in the Earth's magma, and Earth's particles heated with pressure in Earth's interior.
- Classifies objects by more than one property, then reclassifies them in numerous other ways.
- Recognizes and uses class inclusion. All witches fly on brooms. Wilafred is a witch, therefore, she flies.
- All rocks are solids. This is a rock, therefore, it's a solid.
- Use properties to identify objects and group them with other objects by similar properties.
- Rocks are classified by if you can see sand or if they are melted.
- Use properties to identify and validate objects.
- This is sandstone because it has sand that can be scraped off it.
- Describe and identify objects by shape as a general silhouette or looks like.
- This is a rock because it looks like it.
Lower level
Pedagogical Overview
Strategies to achieve educational learnings
Based on learning cycle theory & method
Activities Sequence to provide sufficient opportunities for learners to achieve the targeted outcomes.
Make sure learners have the prior knowledge identified in the background information.
- Introductory Activity - How do we use Earth materials (rocks)?
- Activity 1 - Homemade rocks observation - Observe home made rocks. Draw and record observations with explanations as to similarities and differences.
- Activity 2 - Taking apart the home made rock activity.
- Activity 3 - Separate home made rock powders with water.
- Activity 4 - Discuss different properties: such as luster, & hardness.
- Activity 5 - Measure them: can it be sanded? Paper clip scratch test.
- Activity 6 - Test for calcite
- Activity 7 - Rocks in space?
Focus question
Unit focus question:
- What is a rock?
- What are the properties of rocks?
- From what are they made?
- How are they made?
Vocabulary
- Earth material - a substance that makes up or comes form the earth.
- Rock - is composed of a mixture of ingredients from the solid Earth mineral material that makes up the surface of the Earth or underlying the soil or oceans and can also be found on other similar planets.
- Geologist - a person who studies the earth and the materials of which it is made.
- Property - a characteristic of an object; something you can observe such as size, color, shape, or texture.
- Mineral is one substance that is a solid inorganic substance of natural occurrence that has a fairly well-defined chemical composition with a specific crystal structure.
- Size descriptors
- Circumference: the distance around an object.
- Depth: how thick an object is from top to bottom.
- Diameter: the distance across a round object.
- Volume: the space an object akes up (occupies).
- Mass: the amount of matter in a substance.
- Mineral Properties
Geology vocabulary
Cleavage is the act of splitting rocks or minerals, that don't have a a fine texture, along a coarse-grain.
Compactionis an increase of a force on something that results in an increase of the density.
Composition is the way in which someone or something is put together
Conglomerate is a composite rock made up of particles of varying size.
Coral reef a reef consisting of coral, made of calcium carbonate, consolidated into limestone.
Crystal is a solid having a very regular atomic structure.
Crystalline is consisting of or containing or of the nature of crystals.
Decay is the organic phenomenon of rotting.
Deformation is the changing shape or dimensions of an object as a result of the application of stress.
Density is the amount per unit size. Density = Mass / Volume
Deposit the phenomenon of sediment or gravel accumulating.
Deposition is the natural process of depositing something.
Erosion is the process of wearing or grinding something down.
Extrusive is when a substance is forced while molten through cracks. In geology, through the earth's surface.
Fine-grained consists of fine particles.
Fissure is a long narrow opening.
Fluorescence light is emitted during absorption of radiation of some other (invisible) wavelength.
Foliated is thin leaflike layers or strata.
Foliation is the arrangement of leaflike layers in a rock.
Fossil is the remains of a plant or animal from a past geological age.
Fracture a crack in the earth's crust or rock.
Gemstone is a crystalline rock that can be cut and polished for jewelry.
Geode is a hollow rock with an interior cavity lined with crystals.
Geologist is a specialist in the history of the Earth recorded in rocks.
Geology is the science that deals with the earth's physical structure and substance, its history as recorded in the rocks, and the processes that act on it.
Grain is the physical composition of something.
Hardness is the property of being rigid and resistant to pressure.
Igneous is produced by the action of fire or intense heat.
Inorganic relates or belongs to the class of compounds not having a carbon basis.
Intrusive is the process of forcing molten rock into cracks between layers of other rock.
Lava rock is created when molten, from volcanos flows and hardens.
Loam is a rich soil consisting of sand, clay and organic materials.
Loess a fine accumulation of clay and silt deposited by the wind.
Luster is the property of objects that shines with reflected light.
Magma is molten rock in the earth's crust.
Metamorphic rock undergoes transformation by pressure, heat, etc.
Mineral is a solid inorganic substance occurring in nature.
Mohs scale is a scale of hardness of solids.
Molten is a liquid formed by heating.
Opaque does not transmit or reflect light or radiant energy.
Ore is a mineral that contains metal valuable enough to be mined.
Organic relates to chemical compounds having a carbon basis.
Pebble a small smooth rounded rock.
Rock material consists of the aggregate (collection of particles) of minerals.
Sediment is matter deposited by some natural process.
Sedimentary is formed by or containing the accumulation of deposited matter.
Semiprecious minerals are gemstones of less commercial value than precious stones used in .
Silica is a white or colorless vitreous insoluble solid
Silt is very fine mud or clay or small rocks deposited by a river or lake.
Stalactite is a cone of calcium carbonate hanging from a cave roof.
Stalagmite is a cone of calcium carbonate projecting from a cave floor.
Stratum is one of several parallel layers of material.
Textureis the physical composition of something.
Translucent allows light to pass through diffusely.
Transparency the quality of being clear.
Transparent is able to be seen through with clarity.
Vein is a layer of ore between layers of rock.
Volcanic glass a kind of natural glass produced when molten lava cools very rapidly.
Volcano is a fissure in the earth's crust through which gases erupt.
Weathering change driven by changes in the weather through the action of water (motion, ice, freezing) and wind (erosion by blowing particles).
Materials
- Homemade rocks - need to be made a week before they are used. Takes one week to set and dry.
- Pick (finishing nail), magnifying glass, paper plate, small vials to put separate parts of the home made rock in, evaporation plates, clear grid overlays
- Paperclip, penny, finger nail
- Lab notes
- Assorted rocks. Four group types - Rock samples pictures
- Calcite, quartz, gypsum, and fluorite
- Granite, limestone, marble, sandstone
- Portland cement, limestone, seashells
- Mica, feldspar, quartz, hornblende, calcite, granite
Homemade Rock Recipe
Makes about 18 rocks with a 5 cm diameter. Mix the flour, salt, and alum together
Ingredients
- 250 ml (1 cup) white flour
- 125 ml (1/2 cup) salt
- 10 ml (2 tsp) alum (Alum is used as a drying agent, or astringent. It is not known to be toxic if swallowed but it has a bitter taste and a drying effect in the mouth if tasted. As with all chemicals, the container of alum should not be handled by unsupervised children.)
- 125 ml (1/2 cup) water
- 5 drops red food coloring
- 5 drops blue food coloring
- 3 drops yellow food coloring
- 250 ml (1 cup) coarse sand
- 125 ml (1/2 cup) gravel - 2 different colors (colored gravel, sand, and oyster shells can be purchased at pet stores. Often if you mention you are a teacher and what you are doing, they will donate the materials to you.)
- 30 ml (1/8 cup) oyster shell pieces
Equipment
- Tray, cookie sheet, or plates
- Paper towels
- Bowel or large plastic bag to mix in
- Measuring equipment
Directions
- Mix the water and add food coloring.
- Add the water to the flour mixture.
- Knead until it is uniform in color and texture and does not stick to the bowl. May add a little more water if the dough is crumbly.
- Add the sand and the gravel to the mixture and knead until it is well mixed.
- Divide the mixture into 18 equal pieces about the size of a ping-pong ball.
- Put a rock ball into the palm of your hand, and make a small hole in the center with your thumb.
- Place 10-23 oyster shell pieces in the hole and mold the dough around them.
- Work the ball of dough smoothing its surface and flatten it to about 2 cm thick.
- Put the rocks on top of paper towels in a tray so that they do not touch each other.
- Put them in a warm area to dry and turn them each day so they will dry thoroughly - about a week, depending on the humidity.
- NOTE: putting them in a microwave or oven will make them too hard.
- DO NOT put any left over pieces of sand and gravel down a drain.
- May want to test one with a nail (the geologist's pick) after six days to see if it is dry inside. They should be dry enough to hold their shape and not crumble easily but soft enough to be broken in half and taken apart with the nail (the geologist's pick) without concern of a puncture wound with the nail.
Recipe and activities source: FOSS (Full Option Science Systems) from Britannica Encyclopedia Corporation. Earth Science Module
- Introductory Lab note - Brainstorm uses of Earth materials
- Lab note 1 - Homemade rocks observation - Observe home made rocks. Draw and record observations with explanations as to similarities and differences.
- Lab note 2 - Taking apart the home made rock activity.
- Lab note 3 - Separate home made rock powders with water.
- Lab note 4 - Discuss different properties: such as luster, & hardness.
- Lab note 5 - Measure them: can it be sanded? Paper clip scratch test.
- Lab note 6 - Test for calcite
- Lab note 7 - Rocks in space?
Resources
Lesson Plans
Introduction
Materials
Focus questions:
- How do we use Earth materials (rocks)?
Learning outcomes:
- Brainstorm a list of what they know about how Earth materials are used.
Suggested procedures overview:
- Put learners in groups, focus their attention, and assess their initial understanding of the focus questions.
- Activity - Brainstorm a list of what they know about how Earth materials are used, share their list, and combine it with others.
Exploration - Set the Stage.
- Have the learners get into collaborative groups or pairs.
- Review brainstorming rules.
- Brainstorm: How do we use Earth materials (rocks)?
- Share results and create an initial class list. Accept all answers. If learners want to question what is on the list, then put a question mark beside it and say we will check it later.
Below is a resources list.
List of products made from Earth materials
- Smartphones: Require over 30 minerals, including silicon for microchips and coltan for capacitors.
- Glassware: Made primarily from melted silica sand.
- Concrete: A mixture of limestone, sand, gravel, and water.
- Steel: An alloy made by smelting iron ore and coal.
- Table Salt: The mineral halite, extracted from mines or evaporated seawater.
- Pencil Lead: Made from the mineral graphite.
- Jewelry: Crafted from precious earth metals like gold and silver, and gemstones like diamonds.
- Plastics: Synthesized primarily from petroleum (crude oil) and natural gas.
- Drywall: Constructed from gypsum pressed between heavy paper.
- Copper Wiring: Drawn from naturally occurring copper ore.
- Coins: Stamped from metals like nickel, zinc, and copper.
- Toothpaste: Contains fluoride (a mineral) and abrasives like calcium carbonate.
- Batteries: Utilize lithium, cobalt, or lead depending on the type.
- Aluminum Cans: Manufactured from the ore bauxite.
- Bricks: Fired from natural clay and shale.
- Porcelain & Ceramics: Made from refined kaolin clay and feldspar.
- Talcum Powder: Ground-up talc, the softest known mineral.
- Solar Panels: Built using silicon derived from highly purified quartz sand.
Invention - Explain & evaluate
Could invent initial definitions for Geologist, Earth materials, rock, minerals
- Earth material - a substance that makes up or comes form the earth.
- Rock - is composed of a mixture of ingredients from the solid Earth mineral material that makes up the surface of the Earth or underlying the soil or oceans and can also be found on other similar planets.
- Geologist - a person who studies the earth and the materials of which it is made.
- Mineral is one substance that is a solid inorganic substance (not living source) of natural occurrence that has a fairly well-defined chemical composition with a specific crystal structure.
Discovery
Could introduce Mineral scavenger hunt.
Activity 1 - Homemade rocks observation
Materials
Focus questions:
- How would you describe a rock?
- What is in your homemade rock?
Learning outcomes:
- Observe a homemade rock, draw it, and identify its properties.
Suggested procedures overview:
- Put learners in groups, focus their attention, and assess their initial understanding of the focus questions.
- Activity - Explore descriptions of rocks as being done by observing their properties. Then observe a homemade rock and list its properties.
Exploration - Set the Stage - Engage, Explore, & evaluate
- Have the learners get into collaborative groups or pairs.
- Explain they are going to work as geologists.
- Ask. What they think a geologist does?
- Listen to their answers and explain:
- A geologist is a scientist who studies the earth.
- One thing a geologist studies about the earth is rocks.
- Rocks are a type of earth material, the substances that make up or come from the earth.
Introduce rocks, observations, properties, measurement, and geologists
- Ask. How would you describe a rock? accept all responses. color, size, hard ...
- Make a list of their responses for all to see.
- Introduce the word property. ...
- A property is something you can observe about an object, such as color, shape, or texture.
- Mention the items on the list are properties. And. We use properties to identify things.
- And these are Rock Properties.
- Explain that one of the tasks of geologists is to make detailed observations of the rocks they discover and they do this with the properties of rocks.
- Ask. Are there other observations they can make about a rock? color, size, texture, smell.
Introduce the homemade (Mock) Rocks
- Show learners a homemade rock.
- Ask. How can you learn about these rocks? observe their properties
- Tell them they are going to investigate them.
- Assign groups.
- First, observe them and describe their properties in their lab notes.
- If necessary, discuss how to record.
- The first observations they are going to make is the surface of the whole rock. They should make a sketch of their rock in their lab notes Challenge them to find out as much as they can about what makes up the rock by observing its surfaces and noting them in their notes.
- Make Measurements.
- Review measurement language the tools they will use make their measurements.
- Diameter is the distance across an object.
- Circumference is the distance around the object.
- Depth is the distance through the object.
- Weight is how much the object weighs.
- Make Magnified Observations. Introduce the hand lens as another tool that geologists use to get a closer look at rocks. Show the learners the appropriate technique for using the hand lens. Tell them to choose an interesting section of their rock to look at through the lens.
- Ask them to draw a picture of this view through the hand lens in their notes.
- Show how to mark the part of the rock they view through the lens on their larger drawing.
- Divide into pairs.
- Explain each group of four should divide into two teams.
- One getter for each group of four will bring all of the equipment the two teams will share.
- Instruct the getters to pick up four paper plates, two rocks for their group.
- Then come back for the measuring tools and hand lenses as the teams need them.
- Each group needs one balance, one set of weights, two plastic cups and one meter tape.
- Each team should return the measuring tools when they finish making and recording their measurements.
- Continue to observe and record properties in their lab notes.
Invention - Explain & evaluate
- Bring the groups together.
- Compare observations and make and desplay a summary list of the properties of the rocks the observed so the class can see them.
- Tell. A reader for each team to report the diameter of their rock. Find out which rock had the smallest diameter. Repeat the procedure the other rock measurements so the learners can experience reporting data.
- Tell. Describe what they saw through the hand lens.
- Review, they have been looking at the properties of the rocks (color, texture, size, shape, etc.).
- Ask. How might you find out more about their rocks?
Discover - Elaborate & evaluate
Next activity
Activity 2 - Homemade rock materials & their properties
Materials:
- Homemade rock, finishing nail for geologist pick, small containers with lids 4-5 for each group.
- Lab note
Focus questions:
- What are rocks made of?
Learning outcomes:
- Investigate a homemade rock to see what it is made of by taking it apart and separating it into similar parts.
Suggested procedures overview:
- Put students in groups, focus their attention, and assess their initial understanding of the focus questions.
- Activity - Investigate a homemade rock to see what it is made of by taking it apart and separating it into similar parts.
Exploration - Engage, Explore, & evaluate
- Continue with learners in pairs.
- Discuss how they might find out more about their rocks.
- Explain geologists use tools such as picks to carefully take apart rocks to observe of what rocks are made. Show them the finishing nail, for them to use as their geologist's pick.
- Explain their next challenge is to identify as many different parts of the rocks, or rock ingredients, as they can.
- Tell them.
- Carefully and slowly chip away at your rock and divide the pieces into piles with similar properties.
- Organize your notes in the table for your homemade rock materials.
- Draw a picture of each rock material that is found in the first column.
- In the second describe its properties, and put additional notes in the third.
- Count or estimate how many of each kind of ingredient you find.
- Combine your count of ingredients with your teammate's findings so you have the total ingredients in your rock.
- Record the result in your notes.
- Have the getters get one for each person.
- If necessary help them break the rocks in half as necessary so each person has part of the rock to investigate. If the rocks are too hard to break apart by hand, help them carefully use the nail to chip the rock in half.
- Pairs work with their rock on a paper plates, separate the different ingredients into separate piles on their plates.
- When the rocks have been separated into the different materials and data recorded, ask them to share their findings.
Invention - Explain & evaluate
- Recall and review
- Make a list on the board of ingredients they found (two colors of gravel, shells, sand).
- Ask. How much of each ingredient they found?
- Record and illustrate each different kind of material they found.
- Gravel ... -
- Gravel ... -
- Shells -
- Powder -
- Explain. Real rocks are Earth materials made up of more than one ingredient which can be separated into their different parts, although it isn't as easy as taking a homemade rock apart.
- Look at the leftovers.
- Tell them to describe this material, and ask.
- How do you think you could separate this rock material further?
- After they respond, tell them that they will have a chance to take apart the remaining rock, but first they need to collect the gravel and shells in separate containers.
- Collect the Gravel and Shells.
- Provide two containers for each group. Have each group put all their gravel in one cup and the shells in the other. Have the getters bring the cups to the materials station.
- The leaners will have unseparated rock material remaining on the plates, but it shouldn't contain much gravel or many shells.
- Introduce a vial for each group.
- Tell the class that each pair of learners will get a vial and a lid.
- They should fill the vial one-third full of the remaining rock material, create a label with their names, put the label inside the vial, and put the lid on. Any extra material not placed in the vial can be thrown away. The plates can be brushed off and saved.
- Tell them where to store their labeled vials of unseparated materials, wash hands and clean up their desk tops.
- Can review and close the lesson.
Discover - Elaborate & evaluate
Next activity.
Activity 3 - Rocks in water
Material
- Separated homemade rock materials, vial with lid, syringe to measure water, water (distilled preferred)
- Lab notes
Focus questions:
- How can we separate this material?
Learning outcomes:
- Mix the powder with water, separate, and evaporate.
Suggested procedures overview:
- Put students in groups, focus their attention, and assess their initial understanding of the focus questions.
- Activity -
Exploration - Engage, Explore, & evaluate
- Put learners in pairs.
- Review previous work.
- Ask. What are some of the properties we discovered of your homemade rock? (recall) Color, shape, weight, size, texture, gravel, sand, seashells, powdery,
- How did you separate the ingredients? (recall) Physically separated them by breaking them apart
- What tools would you need to take apart a real rock? (integrating) Rock hammer, chisel, morar pestle, jack hammer, dynamite
- How were the rocks you took apart like real rocks. They had real rock material, and seashells, they were stuck together, they had mass, size, volumem texture, color, ...
- How were they different? (open-ended) They were not made naturally. While the substances in them could be comnined in nature to make a rock, it is very unlikely the combination of these ingredients in this proportion would happen.
- Vocabulary review:
- Earth material - a substance that makes up or comes form the earth.
- Geologist - a person who studies the earth and the materials of which it is made.
- Property - a characteristic of an object; something you can observe such as size, color, shape, or texture.
- Rock - an earth material composed of different ingredients, a mixture of ingredients
- Size descriptors Circumference - the distance around an object. Depth - how thick an object is from top to bottom. Diameter - the distance across a round object.
Activity Rocks in water
- Ask. How might the left over fine powdery material be separated further?
- Have each group take a vial with the powder in it and add 25 ml of water with the syringe. Put the lid on the vial, hold tightly, and shake for about a minute or two.
- Observe and draw the contents and label before.
- Let it rest over night and draw the settled contents and label after.
- Discuss and speculate:
- What did you observe after you shook the vial?
- What did the ingredients do?
- What ingredients did you see?
- How do you think this compares to a real rock?
- What do you think will happen to the material in the vial if we let it sit over night?
- Let it set over night.
- Next day.
- What did you observe after the material sat overnight?
- What ingredients were you able to separate out using the water?
- What kinds of separation do you think happened?
- What ingredients have you discovered so far in the mock rock
- What do you think would happen if we placed a portion of the liquid in a dish and let it sit overnight?
- Slowly and gently pour the liquid from the vial into a flat evaporating dish or plate to barely cover the bottom.
- The settled material can be examined and when done, discarded, and the vial cleaned.
- Observe until the liquid is gone, completely evaporated. If a fan is available, might ask how the process could be sped up. Then gently blow air over the area.
- What did you find in the dish?
- Where do you think these crystals came from?
- What shape are the crystals?
- What do you think the crystal material might be?
- How could you find out what the crystal material is?
- Do you think all substances produce the same shape of crystals?
- How could you find out whether the crystals are really salt?
- How could you find out if there is salt in the ocean?
- Describe an experience that you have had with dissolving?
- Do you think there are other materials in rocks?
Invention - Explain & evaluate
- Draw their finding and share results (Small square crystals with X's in them.) When water was added, the salt was dissolved in the water. When the liquid from the vial was poured into the evaporating dish, the dissolved salt was left after the water evaporated.
Summary
The home made rock was made from: gravel, sand, shells, flour, water, food coloring, alum, and salt. The flour and alum need not be specifically identified other than powder.
Discovery - Elaborate & evaluate
- Tell. Rocks aren't as easy to get inside of as our homemade (mock) rock.
- However, geologists use the same idea of taking apart rocks to see what the are made of.
- For example granite is made of different mineral.
- Challenge learners to find the minerals in a piece of granite. (hornblende, feldspar, quartz, mica)
- There will be no calcite, but they should do the test to see.
Activity 4 - Scratch test
Materials
- Paper clip
- 4 rocks to test that will result in different scratch test results. Like sandstone, granite,
- Chalk, penny - copper, pencil lead with graphite to demo. test
- Short magnified rock videos
- Rock images
- Lab notes
Focus questions:
- How do different rocks scratch?
Learning outcomes:
- Learners will scratch different rocks with different materials.
Suggested procedures overview:
- Put learners in groups, focus their attention, and assess their initial understanding of the focus questions.
- Activity - Do a scratch test and explain that different kinds of rocks property of hardness are different.
Exploration - Engage, Explore, & evaluate
-
Use a paper clip for a scratch test.
- Rocks are composed of minerals that cannot be physically broken apart any further. The property of scratchability can be used to sort minerals.
- Depending on the rocks you can find, select four, preferably the hardest quartz which will not be scratched by the paper clip for learners to test.
- Have a learner demonstrate the scratch test on a piece of chalk and penny to see if they can be scratched with a fingernail.
- Then have them test the chalk and pencil lead to see if they can be scratched with the penny.
- Tell them they will try the scratch test on four different rocks and order them by their hardness (chalk, calcite, quartz, gypsum, and fluorite) Use the paperclip, penny, and their finger nail).
- Tell them to record data on the chart - for each tool write yes or no if it scratches the mineral. Write a summary of the results in the last column. Add other rocks to the table of Mohs hardness.
Mohs hardness
1 - talc
2 - gypsum
3 - calcite
4 - fluorite
5 - apatite
6 - orthoclase
7 - quartz
8 - topaz
9 - corundum
10 - diamond
Minerals are ingredients of which rocks are made. There are over 2,000 of them.
Invention - Explain & evaluate
- Record data so everyone can see it.
- Discuss the similarities and differences.
- Reconcile any differences.
- Conclude that all rocks have the property of hardness and diffrent kinds of rocks have different hardness, but rocks of the same type have similar hardness properties.
- Discuss how other properties can be used to classify rocks into categories so we might better understand Earth and its properties.
Discover - Elaborate & evaluate
- If haven't done the Mineral scavenger hunt start or if started, review.
Activity 5 - Calcite quest
Materials:
- Vinegar, calcite, chalk, assorted rocks, vials, evaporation dish or plate
- Lab notes
Focus questions:
- What is calcite?
- What kinds of rocks have calcite?
Learning outcomes:
- Explain
Suggested procedures overview:
- Put students in groups, focus their attention, and assess their initial understanding of the focus questions.
- Activity -
Exploration - Engage, Explore, & evaluate
- Organize learners into pairs and groups.
- Tell. Calcite is the only mineral that makes bubbles with acid (vinegar).
- You are going to test four rocks, put them in 25 ml of vinegar, let it stand 24 hours, and compare the results with a control of 25 ml of vinegar. The rock samples can be rinsed and reused several times.
- Rocks to test - granite, limestone, marble, sandstone. Record which create bubbles.
- Review properties of calcite - hardness, bubble, color...
- Next day observe rocks are done fizzing and liquid...
- Use the vinegar from the vinegar test, remove liquid and evaporate it. Pour liquid into an evaporation dish and set aside to observe later.
- Remember to include the control (vial with only vinegar).
- Compare the vinegar only evaporation dish to the calcite (crystals) and the residue in the dishes for the other rocks.
Invention - Explain & evaluate
- What does vinegar, acid, react with? . The shiny mineral crystals of calcite are made of calcium carbonate. When an acid (like lemon juice or vinegar) touches them, it causes a chemical reaction that creates carbon dioxide gas. This acid eats away at the shell, bubbling and fizzing as it dissolves the hard mineral into water and gas!
- To simplify the equation to calcium carbonate and acid with hydrogen used in the reaction to release carbon dioxide and an oxygen that combines with the hydrogen to get water. Hence, you have water and carbon dioxide and calcium as the product.
CaCO3 (calcium carbonate) + 2H (acid)
→ Ca2 (calcium) + H2O (water) + CO2 (gas)
- Explain the results as a chemical reaction. Meaning the chemicals are different after the reaction than before the reaction. At the start there was Calcium carbonate when done there is calcium, water, and carbon dioxide.
- Not like ripping paper. Which is a physical reaction. The paper doesn't change.
Discover - Elaborate & evaluate
- Other rocks to test: Portland cement, limestone, marble, coquina, ...
- Tell. Seashells, and crab, snail, clam shells are made of calcium carbonate.
- Ask. Would they react with vinegar?
Activity 6 - What's my rock?
Materials
- Assortment of rocks
- Short magnified rock videos
- Rock images
- Lab notes
Focus questions:
- How are rocks similar and different.
Learning outcomes:
- Describe rocks and group them by similar properties in a class museum.
Suggested procedures overview:
- Put students in groups, focus their attention, and assess their initial understanding of the focus questions.
- Activity - Describe several rocks, compare them to other learner's rocks, and group them by similar properties in a class museum.
Exploration - Engage, Explore, & evaluate
- Organize learners into groups and pairs.
- Create a lab sheet for each rock sample to record properties for each. Name if known, color, hardness, luster, other... To place the rock on in the rock museum.
- Challenge learners to group rocks by similar properties and put them grouped in a class museum.
- Encourage students to put donated by - their name, if they brought a rock.
Invention - Explain & evaluate
- Share the results and have a walk about the rock museum.
Discover - Elaborate & evaluate
Next activity. If there are rocks in space, what would be their properties? Similar or different than those in their rock museum?
Activity 7 - Rocks in space?
Materials
- Research materials
- Lab notes
Focus questions:
- If rocks are made of Earth materials, what about rocks in space?
Learning outcomes:
- Describe rocks in space.
Suggested procedures overview:
- Put learners in groups, focus their attention, and assess their initial understanding of the focus questions.
- Activity - Research rocks in space and report on the properties or rocks as meteors, asteroids, on the Moon, planets, ...
Exploration - Engage, Explore, & evaluate
- Organize learners into groups and pairs.
- Ask. If rocks are made of Earth materials, what about rocks in space?
- If there are rocks in space, what would be their properties? Similar or different than those in their rock museum?
- Ask. Where might you find rocks in space? meteors, asteroids, Moon, planets, ...
- Ask. Would you like to research to find information on the properties of these rocks and how they are similar or different than Earth rocks.
- Form four or more groups ... meteors, asteroids, Moon, planets, ... Other
- Research and prepare a short report back about their location, their properties, other interesting information, and Could they be classified with groups of rocks on Earth?
Invention - Explain & evaluate
- Regroup as a class and groups share their discoveries.
- List similarities and differences of rocks on Earth and in space.
- And Could they be classified with groups of rocks on Earth?
Discover - Elaborate & evaluate
Encourage learners to continue to add to their rock museum and share information about rocks and geology.
Assessment ideas
- What is a rock? A rock is an earth material composed of one or more minerals. Rocks we have studied include granite, limestone, marble, and sand stone. recall
- Name some rocks we have studied. varies by rocks available.
- What is a mineral? A mineral is a basic earth material, an ingredient in a rock that cannot be physically taken apart any further. Minerals we have studied include calcite, feldspar, fluorite, gypsum, hornblende, mica, and quartz. recall
- Name two minerals.
- How can you tell mica and hornblende apart? Both are black, but mica has a special property. It pulls apart in paper-thin, flexible sheets. The hornblende looks more needle- like and fibrous. recall
- What were the minerals you found in granite? Mica, feldspar, quartz, and hornblenderecall
- If you found a new rock, how
would you find out what minerals are in it? Any and all of
the tests studied in the module: scratch test, acid test, looking
for specific properties integrating comrehension synthesis - Why do you think people use granite to construct bridges, buildings, and monuments?
- What do you think is the most interesting property of a rock or mineral we have investigated?
- How do you think minerals get mixed together to make rocks? thematic connection: Interaction, Change
- If an author wrote that a rock is like a chocolate chip cookie, what do you think the author had in mind?
- What would be a good use of a very hard mineral like quartz?
- How would you find out the hardness of three minerals if you didn't have any tool with which to scratch them?
- Suppose you found a brick near your school. How could you find out if calcite is an ingredient in the brick?
Lab Notes for activities
Lab notes introductory - Homemade rocks observation
Materials
- Lab notes
Focus questions:
- How do we use Earth materials (rocks)?
Challenge
Make a list of how we use Earth materials (rocks)?
Lab notes 1 - Earth material uses
Materials
- Homemade rock, clear grid overlay, hand lens
- Lab notes
Focus questions:
- What can you discover about your homemade rock?
Challenge
Draw a picture of your homemade rock and a larger picture of what you saw with the hand lens.


What measurements did you get?
Length
Width
Height or depth
Area
Volume
Lab notes 2 - Homemade rock materials & their properties
Materials
- Homemade rock
- Lab notes
Focus questions:
- What materials are in your homemade rock?
Challenge
- Carefully and slowly chip away at your rock and divide the pieces into piles with similar properties.
- Organize your notes in the table for your homemade rock materials.
- Draw a picture of each rock material that is found in the first column.
- In the second describe its properties, and put additional notes in the third.
| Sketch | Properties | Notes |
|---|---|---|
|
||
|
||
|
||
|
||
|
Lab notes 3 - Rocks in water
Materials
- powder from homemade rock, vials with lids, evaporating dish, hand lens
Focus questions:
- Can water separate materials?
Challenge
Separate the powders.
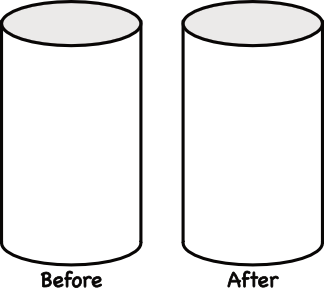
Rocks in water
Draw the vial before and after settling.
Discuss and speculate:
What did you observe after you shook the vial?
What did the ingredients do?
What ingredients did you see?
How do you think this compares to a real rock?
What do you think will happen to the material in the vial if we let it sit over night?
Let it set over night.
What did you observe after the material sat overnight?
What ingredients were you able to separate out using the water?
What kinds of separation do you think happened?
What ingredients have you discovered so far in the mock rock
What do you think would happen if we placed a portion of the liquid in a dish and let it sit overnight?
Pour the liquid contents into an evaporating dish.
 What did you find in the dish?
Where do you think these crystals came from?
What shape are the crystals?
What do you think the crystal material might be? How could you find out what the crystal material is? How could you find out whether the crystals are really salt?
Do you think all substances produce the same shape of crystals?
How could you find out if there is salt in the ocean?
Describe an experience that you have had with dissolving?
Do you think there are other materials in rocks?
Challenge
- Rocks aren't as easy to get inside of as our homemade (mock) rock.
- However, that is the same process geologists must use to see what a rock is made of.
- For example granite is made of different mineral.
- See which of these minerals you can find in a piece of granite. (hornblende, feldspar, quartz, mica, calcite)
Hint
Use a hand lens and look at the embedded particles.
- Feldspar is the most abundant. It looks blocky and chalky. It is pinkish if potassium feldspar and milky-white if plagioclase feldspar.
- Quartz looks like shards of glass, clear, smooth, and colorless like a pane of glass or grey grains that fill the gaps between the other minerals.
- Mica: The shiny, flaky minerals that catch the light, usually occurring as dark biotite or silvery muscovite.
- Amphibole: Mostly specifically the mineral hornblende, which is small, needle-like greenish black specks.
- Hornblende is dull black specks that contrast with the shiny, reflective sheets of black biotite mica.
Lab notes 4 - Calcite quest
Materials
Paperclip, penny, and finger nail, diffeent earth materials, rocks
Focus questions:
- How does a rock scratch?
Challenge
- Select four rocks.
- Use the scratch test on them and record the results.
- Order them by their hardness when you scratch them with the paperclip, penny, and their finger nail).
- Record data on the chart - for each tool write yes or no if it scratches the mineral. Write a summary of the results in the last column. Add other rocks to the table of Mohs hardness.
Hardness chart
| Mineral | Paper clip | Penny | Finger nail | Tools that scratched this mineral |
|---|---|---|---|---|
1. calcite
|
||||
2. quartz
|
||||
3. gypsum
|
||||
4. fluorite
|
||||
5. chalk
|
||||
6. pumice (lava rock) |
||||
7.
|
||||
8.
|
||||
9.
|
||||
10.
|
Which material could be scratched by the most tools?
Least?
Explain.
Which mineral is the most scratchable?
Least?
Place the minerals in order from least to most scratchable?
Explain.
Mohs hardness
1 - talc
2 - gypsum
3 - calcite
4 - fluorite
5 - apatite
6 - orthoclase
7 - quartz
8 - topaz
9 - corundum
10 - diamond
Minerals are ingredients of which rocks are made. There are over 2,000 of them.
Do you think there are other properties that can be tested to help us classify rocks?
Lab notes 5 - Acid test
Materials
Assorted rocks some with calcite. sandstone, chalk, ...
Challenge
Test some rocks with acid.
Minerals to investigate - mica, feldspar, quartz, hornblende, calcite, granite,
- List properties for each rock sample tested. Name, color, hardness, luster, other...
Before vinegar
After vinegar added
After evaporating
Vinegar and calcite
Vinegar alone
Vinegar and
Lab notes 6 - What's my rock?
Materials
Assorted rocks brought by learners and classroom supplies
Challenge
Find rocks that have similar and different properties. Categorize them into groups in a class museum.
Activity more rocks
- Create a lab sheet to record information for each rock sample, record properties for each. Name if known, color, hardness, luster, other... and use it to make a rock museum with rocks categorized by similar properties.
Picture of rock
Possible kind of rock
Color
Hardness
fingernail _____ penny ______ paper clip _____ nothing _____
Luster
shiny ______ not shiny _____
What's my rock?
Find others with different rocks that are similar?
Make a class rock museum.
Lab notes 7 - What about rocks in space?
Materials
Focus question
If rocks are made of Earth materials, what about rocks in space?
Challenge
Research rocks in space. Where might you find them and what are their properties? Could they be classified with groups of rocks on Earth?
Support materials
Mineral Properties
Each type of mineral has its own combination of properties that identify it.
Color - Many minerals come in a wide variety of colors. Different minerals can be the same color. It is difficult to use just color to identify a mineral.
Streak is the color of the powder that rubs off a mineral. This can be seen by rubbing a sample on an unglazed ceramic plate. Sometimes a mineral's streak is very different from the color of the sample.
Hardness is the resistance of a mineral to scratching. Geologists use the Mohs' hardness scale to seriate and compare mineral hardness.
Specific gravity is the ratio of the weight of a volume of a mineral to the weight of an equal volume of water. Higher specific gravity means the mineral is heavier.
Cleavage is how a mineral breaks. Some minerals break in smooth, flat surfaces at identifiable angles, such as calcite. Others fracture and produce no flat surfaces, such as quartz.
Fracture is how a mineral breaks when no cleavage surfaces form. For example, quartz breaks in a pattern known as conchoidal fracture (smooth, curved surface).
Luster is how a mineral reflects light or shines (glassy, vitreous, metallic, dull, and pearly).
Crystal - There are seven main geometric shapes of crystals - cubic, hexagonal, and tetrahedral.
Transparency describes how a mineral transmits light. transparent (see through them); Translucent (some light passes through) or Opaque (no light passes through).
Magnetism - some minerals (magnetite) are attracted by a magnet. Lodestone is a form of magnetite that is a magnet.
Reaction to acid - Calcite will fizz and bubble when it comes in contact with an acid such as hydrochloric acid at room temperature.
Mineral Formation - Minerals form in fluids. Fluids such as molten rock, (below the Earth's surface (magma) or at the Earth's surface (lava). Most of the quartz and feldspar is made this way. The fluids might be hot water (hydrothermal solutions) that have dissolved elements, like copper and gold, that flow through cracks in rocks. Other minerals, such as calcite and halite, often form from seawater, either through chemical reaction, deposition, or evaporation.
What is coal? Plant (organic) or Rock (inorganic)
Coal is an Organic Material.
Coal is organic because it is made of plant debris (carbon-rich).
It began as dead trees, ferns, and mosses in ancient, oxygen-poor swamps.
Over millions of years, heat and pressure vaporize the water and gases leaving behind a highly concentrated mass of fossilized carbon.
Coal is also classified as a rock in geology, because a rock is simply a solid, naturally occurring mass that is made of mineral-like matter (carbon). Although it is made of organic matter.
Therefore, it is officially classified as a biochemical (or organic) sedimentary rock.
It forms distinct underground layers, or seams, just like sandstone or shale.
Coal is NOT a Mineral.
To scientifically be defined as a mineral, a substance must meet strict rules. Coal fails two of them. Being organic it is not inorganic, thus, fails the rule that minerals cannot come from living things. Coal comes from plants. The second rule it fails is it is not a crystalline structure. As minerals have a highly ordered, repeating geometric arrangement of atoms. Coal does not have a specifc shape with a neat internal crystal grid. It's internal structure is a chaotic mix of organic molecules with no organized internal crystal grid.
| Peat | Lignite | Bituminous | Bituminous |
|---|---|---|---|
Loose plant young coal |
Soft brown coal |
Hard black common coal |
Shiny metallic matter highest grade coal |
Mohs hardness levels
Mohs hardness
1 - talc
2 - gypsum
3 - calcite
4 - fluorite
5 - apatite
6 - orthoclase
7 - quartz
8 - topaz
9 - corundum
10 - diamond
Rock Classification Notes
1. Sedimentary Rocks (Layered & Crumbly):
These rocks are made from tiny pieces of sand, pebbles, shells, and mud that pile up over time and get pressed together.
- Texture & Feel: Grainy, gritty (like sandpaper), or feels soft and crumbly.
- Patterns: Distinct stripes, bands, or visible layers of different colors stacked on top of each other.
- Special Clues: These are the only rocks that can have fossils!
- Examples: Sandstone, Chalk, and Limestone.
2. Igneous Rocks (Volcanic & Crystal)
These rocks form when hot, melted rock (magma or lava) cools down and hardens.
- Texture & Feel: Can either be very smooth and glassy, or rough with visible, sparkling crystals.
- Patterns: No layers. They look uniform or have randomly scattered speckles.
- Special Clues: They might have tiny holes or air bubbles trapped inside when the lava cooled quickly.
- Some are so light they can even float on water!
- Examples: Granite, Obsidian, and Pumice.3.
Metamorphic Rocks (Ribbon & Heavy)
These rocks start out as igneous or sedimentary rocks, but get squished and cooked deep underground by the Earth's heat and pressure.
- Texture & Feel: Very dense, heavy, and hard. They often feel very smooth to the touch.
- Patterns: Twisted, ribbon-like, or wavy lines. Sometimes they feature shiny, interlocking crystals.
- Special Clues: They generally do not contain fossils because the intense heat destroys them.
- Examples: Marble and Slate
Dichomtous Rock key
Follow these yes - or - no questions to identify your rock type.
Look closely at the rock.
Step 1:
Can you see separate, tiny grains of sand or pebbles stuck together?
- YES: Go to Step 2.
- NO: Go to Step 3.
Step 2:
Does it feel gritty like sandpaper, or can you see straight, flat layers or fossils?
- YES: It is a Sedimentary Rock.
- NO: Go to Step 3.
Step 3:
Does the rock have tiny holes in it, or does it look shiny and glassy like a mirror?
- YES: It is an Igneous Rock.
- NO: Go to Step 4.
Step 4:
Does the rock look sparkly with random speckles, or does it look like a solid color with no patterns?
- YES: It is an Igneous Rock.
- NO: Go to Step 5.
Step 5:
Does the rock have wavy, twisted, ribbon-like lines, or is it a very heavy, smooth block of white or gray?
YES: It is a Metamorphic Rock.
| Mineral or Mineral Product |
Uses | Object Location or picture |
|---|---|---|
| Aluminum | aluminum foil, cosmetics, beverage cans, deodorant, hand lotion, antacids, cooking pots |
|
| Beryllium | fluorescent lamps |
|
| Chromium | chrome fixtures (cars, bicycles, lamps, kitchens, etc.), stainless steel |
|
| Copper | wires, pipes, cooking pots, old gutters and roofs, brass, pennies |
|
| Fluorite (fluoride) |
toothpaste, drinking water |
|
| Gold | dentistry, jewelry, computers, electronics |
|
| Gypsum | wallboard, plaster |
|
| Halite (salt) | table salt, food preservatives, de-icers |
|
| Iron | cosmetics, hair dye, steel, wrought iron |
|
| Lead | car batteries, computers, fuel tanks, TV tubes, leaded glass, x-ray shields, fishing sinkers |
|
| Mica | sheetrock, paints, hair dye, cosmetics, soap, electronics |
|
| Molybdenum | fertilizer, filament supports in light bulbs, steel |
|
| Nickel | nickel coins, stainless steel, alnico magnets, sheetrock |
|
| Perlite | gardening |
|
| Phosphate | fertilizer, dishwashing detergent,laundry detergent |
|
| Potassium (potash) | fertilizer, toothpaste |
|
| Silica | computer chips, glass, cosmetics, antacids, paint, laundry detergent, drain cleaner, quartz watches |
|
| Silver | photography developer, jewelry, electronics, silverware, dentistry |
|
| Sulfur | fertilizers, matches, car tires |
|
| Talc | baby powder, cosmetics, antacids, sheetrock, primer |
|
| Titanium | cosmetics, hand lotion, soap, toothpaste, hair dye, bug spray, primer, paint |
|
| Tungsten | filament in light bulbs, drill bits (tool steel) |
|
| Zinc | sunblock, fertilizer, cosmetics, dandruff shampoo, pennies, galvanized metal, brass, dry-cell batteries |
|
| Zirconium | deodorant, jewelry |
|
Review
1. Identify two kinds of rocks and two kinds of minerals.
Rock
Rock
Mineral
Mineral
2. If you found a new rock, how would you find out what minerals were in it?
3. What minerals are in Granite?
Major minerals in granite are:
Feldspar: Most abundant. It is pinkish potassium feldspar and milky-white plagioclase feldspar.
Quartz: The glassy, translucent, or grey grains that fill the gaps between the other minerals.
Mica: The shiny, flaky minerals that catch the light, usually occurring as dark biotite or silvery muscovite.
Amphibole: Mostly specifically the mineral hornblende, which is small, needle-like greenish black specks.
4. What is the difference between a rock and a mineral.
Rocks can be made of many different combinations of minerals. Mineral is one substance that is a solid inorganic substance of natural occurrence that has a fairly well-defined chemical composition with a specific crystal structure.
5. Describe how senses are use to study rocks and soil?
Sight to observe properties or color, shape of particles. Taste - salt. Touch - hardness, wieght & mass but more accurate if use a scale.
6. What are the properties of rocks ?
Shape, color, size, texture, smell, taste,
7. In what ways can rocks be helpful to humans?
Anything from the class list
Describe one example how ...
Properties help us identify rocks.
Measuring tools help us gather data about rocks.
Observations can help us discover the ingredients or components of a mock rock.
Properties help us identify minerals.
To separate minerals based on one property.
How settling or layering of materials in water can be used to separate earth materials.
he properties of scratchability can be used to sort minerals.
Home: Pedagogy - theory, curriculum, learning, human development, & teaching
Home: Science - knowledge base, activities, pedagogical knowledge in all dimensions