
Logo Plus Packet
Microsoft LOGO
Questioning is the foundation of all learning.
The first step in rejecting not knowing is to ask, why?
Sweetland
Introduction
Logo is a programming language which creates a mathematical workshop where learners can explore a variety of mathematical ideas through the context of measurement and geometry.
Logo has accumulated a large body of research which suggest that it promotes the understanding of how computers work, logical thinking, metacognition, creativity, motivates all students to want to learn, and increase student's understanding of mathematical knowledge such as: how mathematicians make algorithms to solve problems, problem solving, learning number values, number sequences, similarity of two dimensional figures, rotations, angles, decimal numbers, fractions, infinity and limits, positive and negative numbers, coordinate systems, variables, estimation, geometric shapes, perimeter and area, symmetry, probability, algebra, geometry, trigonometry, calculus, fractals.
Logo Plus Packet:
The Logo Plus Packet is a highly motivational sequenced set of activities which have been designed to introduce learners to the power of Logo as quickly as possible.
MS. LOGO, as of 2026, is still available for download. I don't know how or if the commands are the same, but I offer the packet as it is and was very good at introducing learners to LOGO and programming. A more advanced packet is available in .pdf.
Learners are introduced to the most essential commands to get them started to create solutions to geometric problems. As they become acquainted with essential commands they are introduced to writing procedures and super procedures. Procedures are what gives Logo its power as a mathematical environment for students to solve problems. They can put procedures together with a super procedure to create solutions to complex problems.
The author has used different versions of Logo Packets with learners since 1982 and has consulted with numerous teachers who have used these Logo packets in classrooms.
The present Logo Plus Packet was created specifically for the Logo Plus Computer Language and has had extensive field testing with elementary students and been found to be highly effective. Most are solving complex problems by writing super procedures in a few hours.
Page numbers are on the bottom of the page. If you print the LOGO packet, each page should break after the page number. However, they don't show on the screen.
Enjoy!
LOGO PLUS PACKET
Name:
1. Getting Started:
Put the Logo disk in the disk drive
Turn on the computer and the monitor if needed
You will see a large turtle (terrapin) on the screen
Wait until you see:
WELCOME TO LOGO ...:
?
The flashing cursor ?
means the computer is waiting for you to tell it what to do
You are in charge.
2. Learning Some Commands
2.1 Some commands
Type DRAW and press the RETURN button.
Draw what you see.
The triangle shape on the screen is the turtle.
It's heading toward the top of the screen (heading zero).
When you want to begin a new drawing, type DRAW and press RETURN.
If you make an error typing, you can correct it by pushing DELETE or ESC to erase the error and retype.
page 1
For example:
Type FD12
Now press DELETE twice to erase 12
Now press the SPACE bar and type 12.
See? It's easy to correct a mistake.
What does the DELETE key do?
page 2
After the FD 12 Press RETURN.
Draw what you see.

Type DRAW RETURN
FD 40 RETURN
RT 90 RETURN
FD 4 0 RETURN
RT 90 RETURN
Draw what you see.
What do you think FD means?
Type FD
What message was printed on the screen?
What do you think inputs mean?
Some commands in Logo do not need inputs. Like Draw
Some commands in Logo need inputs. Like FD
You always need a space between commands and their inputs.
Type DRAW RETURN.
Type FD 50 RETURN.
page 3
Type Draw FD 50 all on one line and then press RETURN
You can put more than one command on a line but you have to remember
to put a space between each command.
Spaces are very important in Logo.
From now on you may press RETURN a line.
after each command or a t the end of
Type BK 75.
What do you think BK means?
Try Draw HT FD 20
What happened?
Now try ST FD 20
What do you think HT means?
What do you think ST means?
Type RT
What do you think you could do to give the command inputs?
Did you think of something like RT 90?
Could you think of a series of commands to make a square?
If you need a hint here it is or go to the next page.
DRAW
FD 50 RT 90
FD 50 RT 90
FD 50 RT 90
FD 50 RT 90
page 4
2.2 Making squares
Write a series of commands to make a square that is larger than 50 by 50.
If RT turns the turtle to the right, what command do you think will turn
the turtle to the left?
Write a series of commands that will make a square by turning the turtle
to the left.
2.3 More commands
Type DRAW
FD 45 PU FD 45 RT 90
FD 45 PD FD 45
Wow... look at that!
 Turtle will move without leaving
a trail if you pick the pen up
and then move. Turtle will draw
again after the command pen down.
Type DRAW
Use FD, RT, PU, and PD to draw this shape.
Record the commands here:
page 5
Type DRAW RT 45 FD 70 RETURN
Type CS RETURN
What happened?
What do you think CS means?
Type DRAW FD 87 LT 90 FD 62
Type HOME
What does HOME do?
How could you move the turtle home without drawing a line?
2.4 Lets review
So far you know:
DRAW- clears the screen, moves the turtle home, with a heading of zero.
RETURN- causes the commands to be executed
HT- hide turtle
ST- see turtle
ESC or DELETE-erases one space to the left.
FD - forward
PU - pen up
BK - backward
PD- pen down
LT - left turn
HOME- turtle centered heading zero
RT - right turn
CS- clear screen
Circle the following commands that need inputs?
DRAW HT ST FD PU BK PD LT RT CS
page 6
2.5 Practice
Now try to draw this

Hint: start like this
DRAW
FD 10 RT 90 FD 15 RT 90
FD 20 RT 90 FD 25 RT 90
Finish with your code.
3.0 Repeat for faster squares:
Clear your screen and type this.
FD 40 RT 90
FD 40 RT 90
FD 40 RT 90
FD 40 RT 90
Nice square!
Let's look at it. How many sides?
How many corners?
The sides and corners are all alike.
They seem to repeat.
Now, clear your screen again and type this.
REPEAT 4[FD 40 RT 90]
You just told turtle to repeat everything that is inside the brackets four
times. Which is the fastest way to type commands for a square?
Write a list of commands that will make a square that is 50 turtle steps on
each side:
page8
3.1 Repeat and other shapes
Clear you screen for more turtle moves.
Type each line and watch what happens.
RT 90
RT 90
RT 90
RT 90
Did the turtle go all the way around?
How far is all the way around?
90 + 90 + 90 + 90 = 360
How many times would it take to turn the turtle all the way around with
RT 60?
60 + 60 + ... =?????
Did you figure six RT 60's?
What do you get when you add 60 + 60 + 60 + 60 + 60 + 60 = 360
Can you write a list of commands for making a hexagon using a REPEAT?
Try turning all the way around and counting and adding with other turns.
Triangles have three sides and three corners.
If 120 + 120 + 120 = 360.
Write a list of commands using a REPEAT to make a triangle?
How about a pentagon?
page 9
4. Three screens
Clear your screen.
Type BK 100
The turtle is under the words.
Press CONTROL while you type F
CONTROL F shows a FULL screen of graphics.
Type FD 30
You will not see what you are typing, but it still works.
Press CONTROL while you type S
CONTROL S shows a Split Screen, split with text and graphics
There is one more screen.
Press CONTROL while you type T
CONTROL T shows a screen with only text.
You can switch from one screen to another with these three control
commands.
Lets review:
CONTROL F shows a FULL screen of graphics.
CONTROL S shows a SPLIT Screen split with text and graphics
CONTROL T shows a screen with only TEXT.
Practice these three control until you understand how they work.
page 10
5. Procedures:
You can teach the turtle your own commands.
Here is how to teach the turtle to make a square.
Type To SQ and press RETURN
The screen should look like something you have not seen before.
At the top it tells you that you are in the Editor.
At the bottom and you should see:
CONTROL C to define and CONTROL G to abort
This gives you two ways to leave the editor and return to the command
line. More on this later.
Press RETURN and
Type the commands for making a square. REPEAT 4 [FD 50 RT 90]
Press RETURN and
Type END
Press RETURN
Your procedure is complete and should look like this:
TO SQ
REPEAT 4[FD 50 RT 90]
END
If it doesn't use the arrow keys to move the cursor and delete any
mistakes and retype them. When the procedure is like the sample you are
ready to define it.
Hold down the CONTROL key and press C
This defines your procedure and puts you back at the command level.
Type SQ and press RETURN. Surprised?!
The computer or turtle now will use your list of commands when ever you
you type SQ.
You can make squares all over the screen.
page 11
6. More Procedures
If you have shut off the computer since you last wrote a square procedure
you need to type the SQ procedure into the computer.
Then try this ... on your own thing!
Use SQ to make this pattern
type
SQ LT 90
S Q LT 90
SQ LT 9 0
SQ LT 90
Or you could write another procedure
Try this: think of a name for your second procedure. I'll call it SQS for
squares.
TO SQS (remember returns)
REPEAT 4[SQ LT 90]
END
Remember ... CONTROL C to define the procedure
type DRAW SQS
You have now written two procedures and used one procedure (SQ) in the
list of commands for another (SQS). You can do this as often as you like.
Lets try it by making a flag.
Start with a pole. Type in the following procedure:
T O POLE
FD 60
END
Remember CONTROL C to define the procedure.
Now type DRAW POLE
page 12
To raise the flag, you can use the POLE and SQ procedure in a FLAG
procedure.
TO FLAG
POLE
RT 90
SQ
LT 90
BK 60
END
Try the FLAG procedure (CONTROL C DRAW FLAG)
After you're done admiring your work lets clear the screen and use the
FLAG procedure to make six flags in a circle.
Type FLAG RT 60
FLAG RT 60
And so on for a total of six times.
Too much typing??!! Try teaching the computer or turtle FLAG6
This is one way:
TO FLAG6
REPEAT 6[FLAG RT 60]
END
Try making FLAG12 or FLAG15 or FLAG36
page 13
7. Saving files
As you probably already know when ever you turn the computer off and start Logo the procedures are not in the computer's memory. It would be nice if you could save the procedures so you would not have to type them every time. That is what you will learn now.
The first thing you need to know is where the file will be saved. There are many possible places. On the computer you are working with, or if you are Online and there is a place to store your work, on a flash drive, or portable hard drive.
When you know where it will physically be saved, then use the operating system FILE and find where the device or file on the computer where it will be saved,
You may want to make a new file to save all your creations. If so, do it first.
It is easier to take a few minutes to think about how to organize your work that to do it later.
Find or create you file with the file system.
Then use the file system and select save, name your file, and save it.
Record how you saved your file and make a tree to show how you might organize your work.
page 14
Type GOODBYE
Type SQ
What happened? You should have gotten the message: there is no
procedure named SQ.
That is because when you typed GOODBYE the computer erased all of the
procedures (SQ).
To get the procedure back into the computer you could type it but it is
easier to get it from where you saved it.
Type READ "FILE1
This will cause the disk drive to turn on and read the procedure. You can
tell this has been done because the screen will have the message
SQ Defined
To test to see if it is really there type SQ and see if a square is made.
Try it.
That is all there is. You type your procedures and when you want to save
them you create a name for the file and type it after the quotation marks
and save: SAVE "FILENAME
You might be wondering what will happen if you use a name of a file that
is already on the disk? That file will be erased and a new file will be
made with the procedures in the computer.
So how do you know what files are on the disk?
Simple. With the file disk in the disk drive type CATALOG. If you can't
see all of the files remember CONTROL T to see the text screen.
Do this now and you should see a list of the files on the disk with your file:
FILE1
page 15
Save picture
Let's review what happens when you save file.
When you save a file the operating system checks to see if there is a file on the disk with the same as the file you have created. If there is it will ask if you want to replace it or it will erase the file and save what ever is in the current memory of the computer. So if there is a file with the same name it will replace it.
To avoid erasing files you may want later, be sure you know what is in the file you are replacing.
When you save a file it doesn't save the picture. To do that you need to capture the picture on the screen or use a command to savepict or readpic and then print it.
If you need additional information, ask someone to demonstrate the action of saving programs with different codes into files. You can use sticky notes for the different parts of code stuck onto a piece of paper representing the program and put into a file folder and placed beside the device that will store it. Computer hard drive, portable hard drive, flash drive, Online, cloud.
page 16
8. Print it!!
If your computer is connected to a printer---
1. Draw the picture on the screen by typing the name of the
procedure(s) or draw it by using READPICT.
3. Turn on the printer and position the paper.
4. Type PRINTSCREEN 1 1 or PRINTSCREEN 1 2
5. Answer each question and press RETURN
6. Wait until the printer stops and remove the paper.
page
17
9. Edit Practice:
Create your own Sunshine! Type in these three procedures. Which one
would be considered a super procedure if all you wanted to make was a
sun?
TO PIECE
REPEAT 10[FD 30 BK RT 1]
END
TO RAY
REPEAT 2[FD 60 BK 60 RT 1]
END
TO SUN
HT REPEAT 30[PIECE RAY]
END
For a ring try this:
Type in these two procedures. Which one would be considered a super
procedure if you wanted to make a design?
TO RING
REPEAT 20[FD 7 RT 18]
END
T O RINGRIGHT
REPEAT 10[RING RT 36]
END
RINGRIGHT
If you haven't discovered that you can change a procedure by editing it
now is time to learn.
Let's suppose you wanted to make RINGRIGHT, to turn to the left. You could do this by editing RINGRIGHT the title and turn.
but you wanted the turtle
and changing
Type ED RINGRIGHT
Use the arrows and the delete key to delete RIGHT
Type LEFT in its place.
Then use the arrow keys and the delete key to delete the R
page 18
Type L
Define the procedure and type RINGLEFT
If all went well you should have the same design only drawn to the left.
You might wonder what happened to RINGRIGHT
Type DRAW RINGRIGHT and see if it is still there.
If you want to see a list of the procedures in the computer type POTS
POTS stands for print-out procedures.
You can use the edit function to change procedures in many ways. You can
edit procedures and change them without having to change their title. For
example if you want to add something to them or correct a bug.
Here are some other procedures you might want to use or edit to use
anyway you like.
TO R.ARC
REPEAT 5[FD 7 RT 18]
END
T O L.ARC
REPEAT 5[FD 7 LT 18]
END
TO RAY
REPEAT 2[R.ARC L.ARC]
END
TO SUN
REPEAT 9[RAY RT 160]
END
TO SUNNY
REPEAT 12[RAY RT 150]
END
TO SUNNIEST
REPEAT 18[RAY RT 140]
END
page 19
10. Star Power:
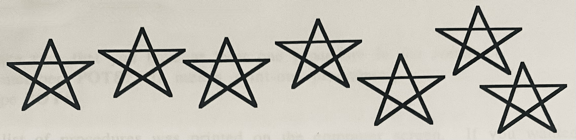
Theses stars are made of 5 lines and 5 turns ... a natural for a REPEAT.
What do you get with REPEAT 5[FD 30 RT 72]
But a pentagon is not a star. For the star's turn, does turtle turn more or
less than the pentagon?
Enter the following procedure and try different numbers after the RIGHT
by typing a number, see what it makes, try a different number, see what
it makes, and repeat the process until you have a star.
TO STAR
REPEAT 5[FD 30 RT ???]
END
page 20
11. Printing Procedures:
Make sure that you have at least one procedure in the computer.
Remember POTS? It means print-out procedures.
Type POTS
A list of procedures was printed on the computer screen. If you wanted
the list of procedures printed on paper you can do that. But first make
sure a printer is connected to your computer, turned on, and the paper
adjusted.
Then type:
OUTDEV 1 POTS OUTDEV 0
A list of the titles of the procedures in the computer is printed on the
printer.
OUTDEV 1 means out device number one (the printer)
POTS you know that one
OUTDEV 0 means out device number zero (the monitor)
To print the procedures try this list of commands:
OUTDEV 1 PO ALL OUTDEV 0
PO ALL means print-out a list of all the procedures in the computer.
When ever you have a bug or a question regarding your procedures get a
print-out of the procedures and take it to your teacher for help.
page 12:
12. Super procedures:
A super procedure is a procedure that makes a whole picture, design, or
other event by typing in the name of the super procedure.
The FLAG6
procedure was a super procedure.
When you typed FLAG6 and pressed
RETURN the procedure made six flags.
To do this the procedure used the
POLE procedure, the SQ procedure, and the FLAG procedure.
Your assignment is to make a design or picture that has five separate
objects and a border.
Remember a super procedure will make all five
objects and the border when you type it's name.
When you finish the project staple a print-out of all the procedures and a picture to this packet.
Have FUN!!!
page 13