
Simple machines - Lever
Unit with activities & plans for upper middle level
Questioning is the foundation of all learning.
The first step in rejecting not knowing is to ask, why?
Robert Sweetland
Overview
- Overview
- Big ideas, concepts, facts, & outcomes
- Science content concepts & outcomes
- Inquiry & science process concepts
- Pedagogical overview
- Activities sequence
- Focus questions
- Materials
- Scoring guide suggestions
- Unit activity sequence
- Activity 1 -
- Activity 2 -
- Activity 3 -
- Activity 4 -
- Activity 5 -
- Activity 6 -
- Lab notes
- Lab note 1 -
- Lab note 2 -
- Lab note 3 -
- Lab note 4 -
- Lab note 5 -
- Lab note 6 -
- Support materials
The unit is designed for learners to experience hands-on activities. Inquiry activities are approached by employing a simple learning cycle of exploration, invention, and discovery. The goal is for learners to make and use a simple lever to explore how it works. The basic science process skills of observation, communication, prediction, and inference are prerequisites for the integrated skills of identifying variables, forming hypotheses, and experimenting to answer questions and lead to a discovery of the relationship of the load to effort. Additionally it identifies variables and how they are used in an experiment and graph of the results to illustrate relationships.
Background resources:
This plan is designed for learners who have very little prior knowledge of
Related study topics:
- Equality & the = symbol and the equal arm balance
- Graphing - Summary sheet with data analysis, variables, relationships, and graphing
Planning information
Learner background information
A plan designed for learners who have prior knowledge in cause and effect, use of observations to make inferences, models as explanations for observble and non observable events, and working in groups.
Intended learnings & learners thinkings
See for more information on what to include in general planning
Content concepts or outcomes
(Source concepts & misconceptions)
Big ideas and specific outcomes:
- The physical world can be explained in a variety of mathematical ways. A lever system is one of the first tools used by humans and is employed in a variety of different ways today to help increase a force to do work. In addition to the use of a tool an equal arm balance is an interesting reference in weights and measurement, our justice system and to represent equality with mathematical equations. In fact one of the variables found most significant to the success of learners in algebra is their quality of the experience with an equal arm balance.
Concepts and facts
- A system is in balance until there is an unbalance of forces to changes its speed or direction of motion.
- Mathematical statements can be used to explain systems.
- Tools are not always complicated and are important for survival and improve the human condition.
Outcome
Describe how the lever is an example of a simple machine that has and is important.
Science concepts: physical, earth, life
Big ideas:
- A lever is a simple machine that helps people do work. In science, work is defined as force acting on an object to move it across a distance. Pushing, pulling, and lifting are common forms of work.
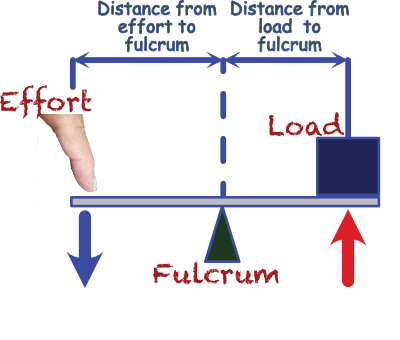
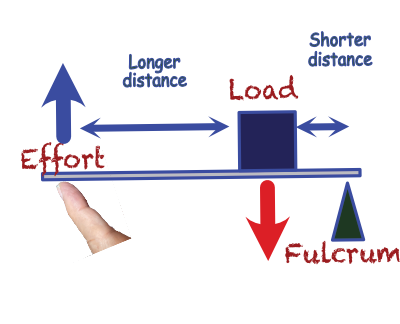
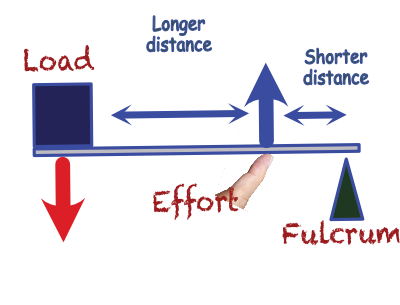
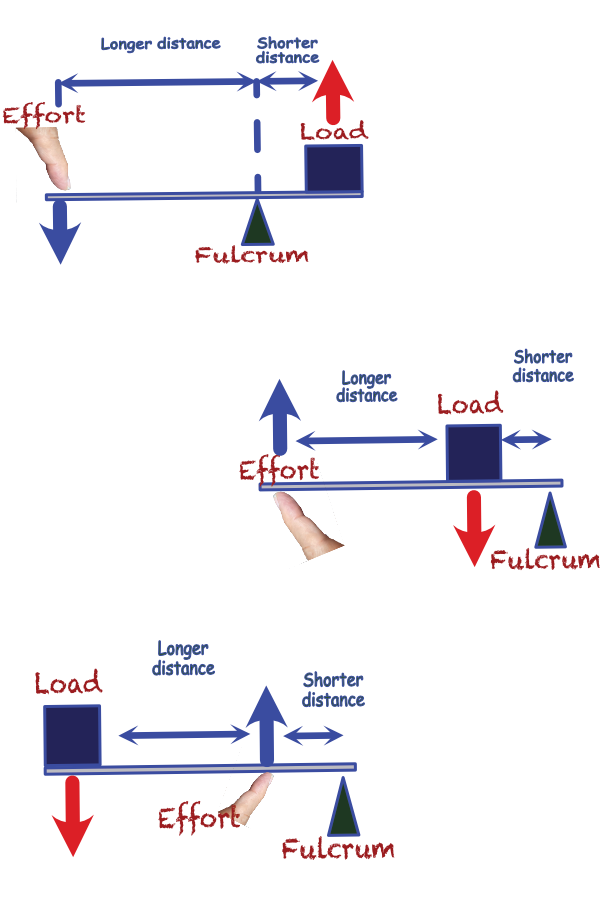
- The lever is a simple machine made up of a stiff arm or arms that pivot or turn. The point on which a lever turns is called the fulcrum. The load is the force of the thing you are trying to move. There are three types of levers. They are classed by the relative position of the arm, fulcrum, and load.
Related concepts
- The force that is applied to a lever is called the effort.
- The weight of an object that resists movement of the lever is the load.
- The effort and load are both forces.
- The fixed point or support about which a lever pivots is the fulcrum
- A first class lever has the fulcrum in the center (A first-class lever is a fulcrum between effort and load.). A playground seesaw is a first class lever. One end lifts an object up just as far as the other end is pushed down.
- A second class lever has the load in the center ( second-class lever is a load between the fulcrum and the effort.). A wheelbarrow is a second class lever. The long handles are the arms of the lever, and the fulcrum is the front wheel.
- A third class lever has the effort and load on the same side of the fulcrum with the effort in the middle (A third-class lever is an effort between the fulcrum and load. A third-class lever is an effort between the fulcrum and load.). The effort is always more than the load, (a mechanical disadvantage), meaning you always get less force out than you put in. A fishing pole is a third class lever. When the pole is given a tug it pivots around the fulcrum that is your wrist. One end stays still as the other end flips in the air catching the fish (moving the load).Simple machines are tools used to make work easier.
- A lever is a simple machine.
- A lever is a rigid bar that pivots around a point that is used to move an object at a second point by a force applied at a third point.
- A spring scale can measure force. In the metric system it is neutons and American it is ounces or pounds.
- Force is a push or pull with a mass that causes a change in motion.
- Mechanical advantage ratio of force in a lever sytem is determined by the length of the effort arm divided by the length of the load arm.
- Work = force * displacement
Outcome
- Describe the relationship in a lever system between the load and the effort used to move the load.
- Describe different kinds of tools that use a lever system to achieve an advantage for doing work.
Anticipated learner thinkings & misconceptions
For many learners machines and tools are like black boxes. They may knowhow to operate them, but not how they achieve their advantage.
- A machine has a motor.
- A machine does all the work.
- An advantage of a lever system is such that it takes less work to move a load the same distance with the lever than without it.
Inquiry, process, & cross cutting concepts & skills
Inquiry
- When I experiment I collect observations that describe how different properties change (become variables) when objects and systems interact. This helps me make claims, explain what is happening, and to predict what might happen in the future.
- An experiment can be created to identify variables and their effects on interactions by using if/then thinking.
- It is helpful to have a tentative answer, or hypothesis, as we try to answer our question.
- As we become more experienced at asking questions and making predictions, we improve our ability to make careful hypotheses from which we design experiments
- Inquiry concepts
- Process concepts
- Perspective concepts
cross cutting
Big ideas: See also Concepts & misconceptions
Related concepts and facts
- Observational data and reasoning is used to explain interactions. Evidence is something that
is observed and can be used to understand what is happening and make predictions
about future changes.
- Models are structures that correspond to real objects, events, or classes of
events.
- Explanations are based on observation derived from experience or experimentation and are understandable.
- Pictures or symbols represent objects.
Outcome -
Specific outcomes -
Other possible concepts
Attitude
- Curiosity and persistence are needed to solve and understand problems.
- I can create a simple machine if I just keep trying and use the material given.
- If one plan doesn't work, I can try another. I am capable of using science to better understand the world.
History of science and development of technology - perspective of science
See also Concepts & misconceptions also science, math, technology timeline
- People have practiced science and technology for a long time.
- Science develops over time.
- Levers helped build the pyramids and other ancient activities.
Scoring guides suggestions (rubric)
(scoring guide)
Top level
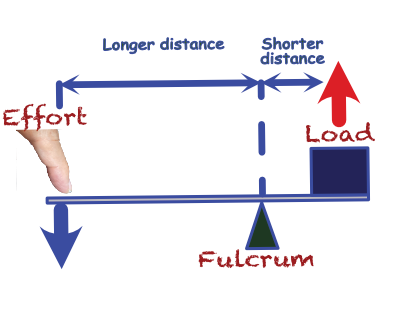
- The distance a load is lifted times its mass is equal to the distance the effort is exerted times the distance it travels.
- The effort to lift a load is less the farther the effort is exerted away from the fulcrum. And the distance the effort travels is farther the farther away from the fulcrum.
- When you use a lever it doesn't really save work it just makes it easier because you have to exert a smaller force over a longer distance.
- There is a relationship between how much of a load is lifted to how much work you need to do to lift it with a lever.
- Levers can lift heavy loads with less effort.
- Levers are tools for doing work.
Lower level
Strategies to achieve educational learnings
Based on learning cycle theory & method
Instructional Procedure
Pedagogical Overview
Activities Sequence to provide sufficient opportunities for students to achieve the targeted outcomes.
Make sure learners have the prior knowledge identified in the background information.
- Activity 1 - Lever and advantage
- Activity 2 - Lift the Load
- Activity 3 - Modifications to Lift the Load
- Activity 4 - Lever Classes
- Activity 5 - Real World Levers
- Activity 6 -
- Activity 7 -
Focus question
Unit focus question:
What makes a lever a tool?
Vocabulary:
- Resistance - Opposition of some force.
- Friction - Resistance to movement.
- Work - Force acting on an object to move it across a distance.
- Machine - An object that will do work for us.
- Lever system
- Effort
- Load
- Independent variable
- Manipulated variable
- Responding variable
- Dependent variable
- Controlled variables
- Graphing
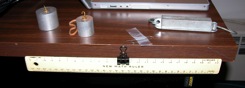
Materials
- Safety Precautions: Remind learners that safety goggles must be worn at all times. Beware of those who might try to catapult load material across the room.
- Goggles For each group: ruler, duct tape, large paper clip, any proportionally sized blocks or masses to be used as load, spring scale, paper clips to use as hooks.
- Lab note 1 - Lever and advantage
- Lab note 2 - Lift the Load
- Lab note 3 - Modifications to Lift the Load
- Lab note 4 - Lever Classes
- Lab note 5 - Real World Levers
- Lab note 6 -
Resources
Lesson Plans
Activity 1 - Lever and advantage
Materials
- Can of paint, paint opener or screw driver,
- Large paper clip, ruler, rubber band, duct tape, masses.
- Lab note
Focus questions:
What is an advantage of a lever?
Learning outcomes:
- Explain how the force of a lever varies with its length from the fulcrum to where the effort is being applied and the distance traveled by the load and effort are related to the their distance from the fulcrum.
Suggested procedures overview:
- Put learners in groups, focus their attention, and assess their initial understanding of the focus questions.
- Activity - Explore lever system and describe how the force of effort used with a lever varies with its length from the fulcrum to where the effort is being applied. And the distance traveled by the effort and the load are related.
Exploration
- Put learners in pairs.
- Ask. Have you ever had to open a can of paint, such as house paint.
- What would you use to open it? Have act out how.
- How would you use the tools suggested to get the can of paint open? Accept all answers. Do not give any indications as to a right or wrong answer.
- Ask. Do you know what kinds of tools you all mentioned are called? Explain all the tools a person would use to open the can of paint are called levers.
- Ask. How do they give the person an advantage to opening the can?
- Introduce the lever journal (lab notes) and explain they are starting a series of scientific investigations with lever systems. They can keep good records of their observations.
- Select a pair of learners to model for you as you explain the following.
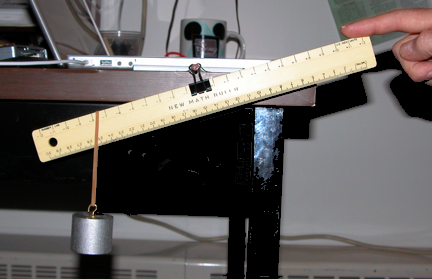
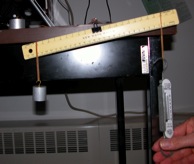
- Set up the first lever system while learners watch.
- Unfold the outside arm of a large paper clip. Tape the large paper clip to the desk with duct tape so the oiutside arm hangs over the edge of the desk about 3 cm.
- Next take the ruler and attach a binder clip in the middle (this will be the zero position) Flip the metal loops of the binder clip up. This will be the lever arm.
- Slip the loops over the paper clip so that it will rotate. Adjust the location of the clip on the ruler until it balances (balanced lever system).
- Select one of the masses.
- Attach one end of the rubber band to it.
- The other end of the rubber band will slide over the ruler.
- This mass, lifted by the lever, is the load.
- Hang the load, using the rubber band, on one side of the ruler.
- The effort is the force (push or pull) needed to lift or move the load.
- Explain that when the load hangs on the lever or on the spring scale, it pulls down with force.
- Have a learner move the load up and down using one finger on the opposite side of the lever.
Tell the groups or pairs to set up their own balanced lever systems. Free explore and then use their finger to explore lifting the load close to the fulcrum, medium away, and far away.
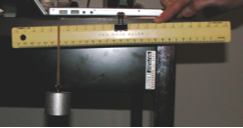
Lifting the load with finger close to the fulcrum.

Lifting the load with finger medium to the fulcrum.
Lifting the load with finger farthest from the fulcrum.
Invention -
- Share results and discuss with the learners.
- Use learners drawings and have them identify the parts of the lever system.
- The mass lifted by the lever is the load, the load pushes down with its force (weight, mass).
- The ruler is the lever.
- The paper clip and binder clip are the fulcrum.
- The effort is the force (push or pull) of your finger to lift or move the load.
- Have them draw and label in their lab notes.
- Ask. How can you represent the different forces for each of the different places your finger pushed? An arrow with words or different lengths
Discover
Exploration 1b
- Present these review questions:
- Can you lift the load using one finger?
- Does it always take the same amount of force to lift the load?
- Where should you press to lift the load with the least force?
- Ask them to write about how levers provide individuals with an advantage.
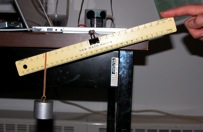
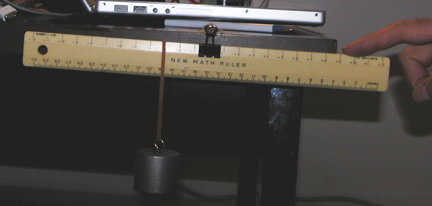
- Tell the groups they will set up a balanced lever system with the load hanging at 1 cm.
- Then they should explore lifting the load at the 15 cm point and 30 cm point from the fulcrum.
- Then after they explore it by hand you want them to measure the force used to lift the different loads. However, you aren't sure how they should do it. You are thinking there are several ways. Review the following with them and make a decision as to how to measure.
- They could hang weights from 15 cm and 30 cm to ballance the weights at 1 cm on the other side of the fulcrum.
- They could pull down with a spring scale at 15 cm and 30 cm and see how much force is needed to lift the load at the 1 cm point. However, you think ther might be a problem with this as the weight of the spring scale will effect the reading when it is used upside down. Sooooo you are wondering how to solve this problem.
- Would it work to weigh the spring scale and subtract it from the reading?
- Could another spring scale with the same weight be hung on the other side at 15 cm and 30 cm as a counter balance?
- Or if you have a pulley could be used to change the direction and pull up with the spring scale to pull down on the lever.
- Or ... Is it close enough to find a relationship without an adjustment?
- Decide on a procedure and select a pair of learners to model the decision.
- With a weigh at the 1 cm, use the procedure selected to determine what force will lift the load at 15 cm and 30 cm.
- If necessary, review how to read a spring scale.
- Let groups explore the lever system and collect the data.
Invention
Share observations and draw conclusions about the relationship about the effort and load of a lever.
- The effort to lift a load is less the farther the effort is exerted away from the fulcrum.
- The distance the effort travels is farther the farther away from the fulcrum.
Activity 2 - Lift the Load
Materials:
- Large paper clip, ruler, rubber band, duct tape, masses, spring scale.
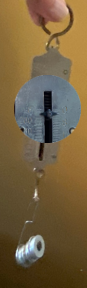
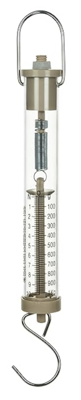
Spring scales - ounces & Neutons
Focus questions:
- How does a lever operate?
- How does the mass of the load effect the effort of a lever?
- What is an advantage of a lever?
Learning outcomes:
- Explain how the force of a lever varies when the load is changed and the distance from the fulcrum to the load and where the effort is being applied is the same.
Suggested procedures overview:
- Put students in groups, focus their attention, and assess their initial understanding of the focus questions.
- Activity - Explore a lever and the change in the load being lifted. Collect numerical data, graph, and explain how the effort force varies when the mass of the load is changed and the distance from the fulcrum to the load and the distance from the fulcrum to the effor is the same.
Exploration
- Put learners in pairs.
- Ask. What did you learn about the lever in activity one? accept all answers
- Where are levers used in the world? everywhere
- Ask. What differences were there when they moved the load with the effort close to the fulcrum and farther away from the fulcrum? It took less force the further away. And the distance the effort travels increases as the effort moves farther away from the fulcrum.
- How much force (effort) is needed to lift a load?
- Set up a balanced lever systems (same as previous experiment) and ehave a student model how to explore how much effort is needed to lift a given load. Observe to see if any group or individual can read the force needed to lift the load.
- Review that when the load
hangs on the lever or on the spring scale, the spring scale pulls down with a force added to the force from a finger. And the different options:
- Would it work to weigh the spring scale and subtract it from the reading?
- Could another spring scale with the same weight be hung on the other side at 15 cm and 30 cm as a counter balance?
- Or if you have a pulley could be used to change the direction and pull up with the spring scale to pull down on the lever.
- Or ... Is it close enough to find a relationship without an adjustment?
- Ask. If they want to use their prvious selected procedure or change the procedure they can use to lift adifferent load sand collect numerical data?
- Make sure they explain the following or
ask questions and/or explain that: The scale can be used for measuring the
amount of force (in neutons or ounces) needed to lift a load. Decide what data and how it will be
recorded in the journals.
One idea - change the amount of mass for the load (maniulated or independent variable) by five washers or ten grams in the same location (controlled variable) and same distance for the effort (controlled variable). Example the load stays at 2cm, and the effort is applied at 2o cm from the fulcrum (as the load is increased. - Results can be recorded on a chart and later graphed. A graph with mass (washer or gram weights - manipulated variable and independent variable) on the horizontal axis and the force needed to lift them (force in ounces or neutons, responding variable, dependent variable) on the verticle axis. The distance from the fulcrum for load and effort to lift is controlled.
- If they desire the teacher may have a couple of learners present a demonstration. Put the load 2 cm from the fulcrum. Put the scale 20 cm from the fulcrum on the other side. Demonstrate how to emasure the force being applied to lift the load? Read the scale. If a light load is being lifted with no effort? How is that possible? If the weight of the scale is lifting the load, how can that effect the results? Suggest they use one scale to weigh another.
- Now ask how to calculate the total force. Explain tthe scale reading does not include the pull of the scale itself. The total effort is the sum of the reading on the scale plus the scale. They should adjust and record this sum as the effort force.
- Now they are ready to begin their own investigation.
- Allow time to collect and record their data.
- When finished collecting their data have them display it so the entire class can view it.
Invention
- Recall and review the data.
- Discuss what is the same and different for each groups
- Ask. What does the data show about the force as the load changes?
- Does the lever provide an individual with an advantage?
- Did the amount of force needed to lift the load change when the load was changed?
- A graph of the results suggest what kind of relationhip between force and load.
- What is that relationship? As the mass of the load increases the force required to lift it increases proportionally.
Discover
- Next ...
Activity 3 - Modifications to Lift the Load
Materials:
- Large paper clip, ruler, rubber band, duct tape, masses, spring scale.
- Lab notes
Focus questions:
- How does a lever operate?
- How does the length of a lever affect the oiutcome?
- What is an advantage of a lever?
Learning outcomes:
- Explain how the force of a lever varies when the length of the lever is changed and the distance from the fulcrum to the load is constant and the mass of the load is the same.
Suggested procedures overview:
- Put students in groups, focus their attention, and assess their initial understanding of the focus questions.
- Activity - Explore a lever and the change in its length. Collect numerical data, graph, and explain how the force of a lever varies when the length is changed and the distance from the fulcrum to the load and the mass of the load is the same.
Exploration
- Put learners in pairs.
- Ask the learners what they learned about the lever and how it lifts different sized loads? The change in the effort force was proportional to the change in the mass of the load.
- In the previous investigation we changed the size of the load and used the same lever length.
- What do you think would happen if the same load stayed in the same position relative to the fulcrum and the effort on the lever got farther and farther from the fulcrum? accept all answers
- Would you get the same results you did with yesterday’s experiment? yes ... proportional and no different objects being used
- Ask. How might we explore this today?
- Have them demonstrate how to set up the balanced lever and the spring scale. (The scale will be set up in the same manner as they were for the previous experiments. However, the scale (effort point) will move (say 5 cm each trial) and the load will be the same amount (say 50 - 100 grams) and will stay in place.
- Demonstrate and discuss what may happen and suggest any adjustments they think might improve their explorations.
- In groups of twos, have them begin the experiment.
- The process will be the same as the previous lesson only they will increase the length of the lever on their ruler.
- Observe them as they work and make sure each group is completing the experiment as they designed.
- Help those who may become confused throughout the process especially measuring correctly as they move the effort and scale to lengthen the lever.
Invention
- Display data so all can view.
- How do your results of yesterday’s experiment compare with those of today?
- How did you measure?
- How did you collect your data?
- What did you use to gather your data?
- What is the relationship between the length of the lever in the lever system and the effort it takes to move ithe load
- How is the length an important factor in the lifting process?
- Conclude with a discussion about the
results. How do these results compare with those
of the previous experiment?
Discovery
- Next ...
Activity 4 - Lever Classes
Materials
- Large paper clip, ruler, rubber band, duct tape, masses, spring scale.
- Lab notes -
Focus questions:
- What happens if the position of the fulcrum, load, and effort are changed?
Learning outcomes:
- Explore three classes of a lever.
Suggested procedures overview:
- Put students in groups, focus their attention, and assess their initial understanding of the focus questions.
- Activity - Describe how the fulcrum can be moved to three places and three different classes of levers can be created.
Exploration
- Set up the demonstration of lever system.
- Ask. What are the components of the lever system.? Lever arm, fulcrum, load and effort
- Ask. What advantage do levers provide for a user? Provide a way to change force to move a load
- What is a force? push or a pull
- Explain that when the load hangs on the lever or on the spring scale, it pulls down with force.
- Place a load at 20 cm. Place a spring scale at 10 cm on the other side of the lever.
- Ask. Will the effort needed to lift the load be more, less, or the same as the pull of the load? more
- Discuss their prediction and why they think it.
- Lift the load and have a learner read the effort. the effort required (scale reading plus weight of scale will be about twice the force of the load pulling down.
- The lever has the fulcrum in the middle of the lever arm. Is the fulcrum always right in the middle of the lever arm? no
- What might happen if the lever was not in the middle?
- Would it still be a lever? yes
- Is there any advantage to moving the fulcrum to new locations along the lever arm? depends on what yu want to achieve
- What are all the possible ways a lever system could be set up? You need to decide if you want to invent all three possible classes here or to accept all answers and let them explore and invent the three later in the invention. Logically you can move the fulcrum to the right, in the middle, on the left. You ight want to go this route and not show details till after they explore.
- Have the learners set up their own lever systems and explore what happens when they move the placement of the fulcrum.
- As they explore the possibilities, move around the room and ask different groups what they are finding out about the placement of the fulcrum. They should report that the closer the fulcrum gets to the load, the easier the load is to lift.
Invention
- Tell them they have been working with class-1 lever systems.
- Class-1 levers always have the fulcrum somewhere between the load and the effort.
- Now ask. What other arrangements of load, effort, and fulcrum can be made?
- Draw their suggestions on the board, make sure one has the load in the middle (between the effort and fulcrum) and one has the effort in the middle (between the load and fulcrum).
- Ask. Did you find and explore all three?
- Decide if they need to return to their groups and set up these different kind of lever systems to explore.
- Try to find out what kind of advantage (if any) each provides.
- Allow time to solve the problems they find with these new lever systems. It may take some time for them to realize that the effort must be applied in an upward direction sometimes. Be patient and let them explore. If after some time they are not having success, bring them back as a whole group and provide them with a couple of helpful hints. Demonstrate how to place the binder clip on the end of the lever arm. It should be placed under the zero end of the ruler. Tell them to use this side of the lever arm. You may also need to suggest that some levers might work with the effort going upward, rather than downward as they did in previous explorations.
- Allow them to return to work in their small groups and after all groups have worked with at least one new lever system.
Invention 2 or discovery
- Have them share diagrams of their lever systems.
- Introduce the new lever vocabulary.
- Levers with the fulcrum in the middle are class -1 levers,
- Levers with the load in the middle are class-2 levers and
- Levers with the effort in the middle are class-3 levers.
- Have them set up an example of each of the three classes of levers. They should notice which ones seem to provide the greatest advantage to the user.
- After they do, bring them back together and discuss with all of them the three types of lever systems.
- What is important about the placement of the fulcrum?
- Does it always have to be placed in the same place?
- Does the placement affect the amount of effort needed to lift a load?
- Allow for a few minutes at the end so the learners may edit their lab books about the lever classes they discovered in today’s activities.
Discover
Explore real life uses of levers. Next ...
Activity 5 - Real World Levers
Materials:
- 1 Broom, 1 Nutcracker, 1 Scissors, 1 Bottle Opener, 1 Pliers, 1 Tweezers, 1 Hammer,
- Loads with rubber band, Masking tape, Lever
- Lever Diagram Poster (optional),
- Lab notes -
Focus questions:
- Where can you find levers?
Learning outcomes:
- Explain
Suggested procedures overview:
- Put students in groups, focus their attention, and assess their initial understanding of the focus questions.
- Activity -
Exploration
- Organize learners into pairs and groups.
- Ask. Where can you find levers? listen to all answers and write them where all can see
- What are some daily household jobs in which levers are used? answers vary. broom, scissors, bat, paper punch, plant shears, hammer, pliers, nutcracker, bottle opener, tweezers,
- What types of machines use levers? answers vary.
- Can you think of any sports or other activities that use levers? bats, rackets,
- Tell them that levers are all around them.
- They are in every toolbox and kitchen-utensil drawer.
- They are found in toys, appliances, cars, and construction machinery.
- Review the classes of levers.
- Explain each lever class and the way it is different
from the other two. Refer to lever class diagrams.
- The class-1 lever has the fulcrum in the middle, with the load on one side and the effort on the other. A paint can opener is an examplesof a class-1 lever. Continue the discussion for other classes.
- Class-2 lever is a wheelbarrow. It has the load in the middle and fulcrum on the end
- Class-3 lever is a broom, bat, racket, lacrosse stick or crosse. It has the fulcrum on the end and the load on the other end.
- Explain. You have a number of tools to explore and investigate. Each tool uses one or more levers to give its user some kind of advantage.
- Explore the tool, analyze it to find the lever, draw a diagram of the tool identifying where the load, fulcrum and effort are located and write the class of levers it belongs to.
- Do one example together so they understand what they are going to do. Use a screwdriver to open a can of paint.
- What class of lever is the screwdriver when it is used to pry the lid off a can? When you are trying to lift the lid off a can of paint, there is no metal cube to be lifted. Where is the load, and what direction is the load acting? Explain to the students that load can be either a mass that you can lift or a resistance that you need to overcome. The tight lid on the can requires a lever to get it loose. The resistance is the load. You try to lift the lid up, so the resistance (load) is acting down.
- Have them identify the load, fulcrum, effort and class of the screwdriver and paint can.
- Divide them into eight groups. Assign each group a number. The number will correspond to the numbered object they will investigate first.
- Put the numbered objects at the materials station. Have each group pick up the appropriate tool and begin investigating it.
- You may need to help some groups get started by helping them identify the resistance (the nut in the nutcracker) as the load in the system. The nut resists being crushed, so it is pushing out against the jaws of the nutcracker. Once each group is going and working with their tool, you should continue to observe and help with any problems a group may have.
- Remind them to diagram each tool they investigate in their lab notes.
- When they finish diagramming one tool, have them switch tools so they can investigate another tool.
- Continue this procedure until all groups have explored each tool and diagrammed it in their lab notes,
Invention
- What did you find out about each tool?
- Were they all levers?
- How do these tools make our daily lives easier?
- Encourage them to think of other things around the classroom or home that are levers. Make a list on the board and have them record that in their lab notes.
- Reference Lever class diagrams
- The class-1 lever has the fulcrum in the middle, with the load on one side and the effort on the other. A crowbar, prybar, seesaw, scissors, paper punch, pliers, are examples of a class-1 lever. Continue the discussion for other classes.
- Class-2 lever is a wheelbarrow, staplers, bottle openers, nut cracker, nail clippers.
- Class-3 lever is a broom, bat, racket, lacrosse stick or crosse.
Discover
Next demos
Activity 6 - Real World Levers demos
Materials
- Collection of simple machines
- Lab notes -
Focus questions:
- How many different ways can I find where levers used in everyday life.
Learning outcomes:
- Describe different uses of levers.
Suggested procedures overview:
- Put students in groups, focus their attention, and assess their initial understanding of the focus questions.
- Activity - Listen to presentations and describe different uses of levers.
Exploration
- Organize learners into groups and pairs.
- Begin by having them give an example of the three classes of levers.
- Have a learner come to the board and put up a simple drawing of a lever and label the parts.
- Once the class has reviewed the levers and classes, divide your class into three groups.
- They will then draw from the three classes to see which class they will do a report on.
- The groups will begin by drawing pictures of levers in that class and writing explanations as to how it works.
- They will be asked to create a presentation that is no longer than 8 exampls and no shorter than 6. In the presentation they will be asked to demonstrate and talk about how their class of levers works, the different parts of the lever, and at least 4 examples.
- Each will be responsible for at least one example.
- The ywill create and edit their final product.
- The teacher will oversee and help in any trouble spots the groups may have.
Invention
- Regroup as a class and groups demonstrate their projects.
- The students will each present their part of the presentation, telling what it is from their frame they learned. The teacher will assess the student’s knowledge of the class of lever they were assigned.
- The activity can be drawn to closure by talking briefly about each class of levers and the uses.
Discover
Continue to find real world uses of levers.
Lab Notes for activities
Lab notes 1 - Lever and advantage
Materials
- large paper clip, ruler, rubber band, duct tape, masses.
- Lab notes
Focus questions:
- How does a lever's length affect what you feel when you push on the lever arm?
Picture lever system, push close to fulcrum, and results
Picture lever system, push medium to fulcrum, and results
Picture lever system, push farthest to fulcrum, and results
- Can you lift the load using one finger?
- Does it always take the same amount of force to lift the load?
- Where should you press to lift the load with the least force?
Lab notes 1b - Explain a relationship with numbers (quantitatively)
Materials
- large paper clip, ruler, rubber band, duct tape, masses, spring scale.
- Lab notes
Focus questions:
- How does a lever's length affect the force needed to lift a load. A lever with twice the length (15 cm & 30 cm)?
Review
Can you lift the load using one finger?
Does it always take the same amount of force to lift the load?
Where should you press to lift the load with the least force?
How do levers provide an advantage?
Explore
Make a lever and hang a weight a one centimeter from the fulcrum.
Explore lifting at one distance and another distance twice the first distance. Say 15 cm and 30 cm.
How can we measure the force used to lift the loads?
| Trial 1 | Trial 2 | Trial 3 | Average | |
|---|---|---|---|---|
| Load at 15 cm | ||||
| Load at 30 cm |
Lab notes 2 - Lift the Load
Materials
- large paper clip, ruler, rubber band, duct tape, masses, spring scale.
Focus questions:
- How does the mass of the load affect the operation of a lever system?
Challenge
Design an investigation to collect data to answer the question.
Results
| Trial 1 | Trial 2 | Trial 3 | Average | |
|---|---|---|---|---|
| Load 1 mass | ||||
| Load 2 mass | ||||
| Load 3 mass | ||||
| Load 4 mass |
Conclusion

Lab notes 3 - Modifications to Lift the Load
Materials
- large paper clip, ruler, rubber band, duct tape, masses, spring scale.
Focus questions:
- How does the mass of the length of a lever affect the operation of a lever system?
Challenge
Design an investigation to collect data to answer the question.
Results
| Trial 1 | Trial 2 | Trial 3 | Average | |
|---|---|---|---|---|
| Length 1 | ||||
| Length 2 | ||||
| Length 3 | ||||
| Length 4 |
Conclusion
Lab notes 4 - Lever Classes
Materials
Focus questions:
- What happens if the position of the fulcrum, load, and effort are changed?
Draw a diagram for each class of lever.
Lab notes 5 - Real World Levers
Materials
- 1 Broom, 1 Nutcracker, 1 Scissors, 1 Bottle Opener, 1 Pliers, 1 Tweezers, 1 Hammer,
- Loads with rubber band, Masking tape, Lever
Background
- The class-1 lever has the fulcrum in the middle, with the load on one side and the effort on the other. A paint can opener is an example of a class-1 lever.
- Class-2 lever has the load in the middle and fulcrum on an end. Example is a wheelbarrow
- Class-3 lever has the load on the end and fulcrum in the middle. Example is a broom.
Lab notes 6 - Real World Levers
Challenge
Make three lists, one for each class of levers and draw a diagram for a model of each class and make a list of examples.
Home: Pedagogy - theory, curriculum, learning, human development, & teaching
Home: Science - knowledge base, activities, pedagogical knowledge in all dimensions