Dinosaurs tracks and four bone activities
Questioning is the beginning of understanding!
Franklin
1. Foot prints in the rocks
Use the images at the link below, which shows the tracks in three groups at a time. Ask what they observe and what inferences they can make based on their observations. Observe, discuss, and infer.
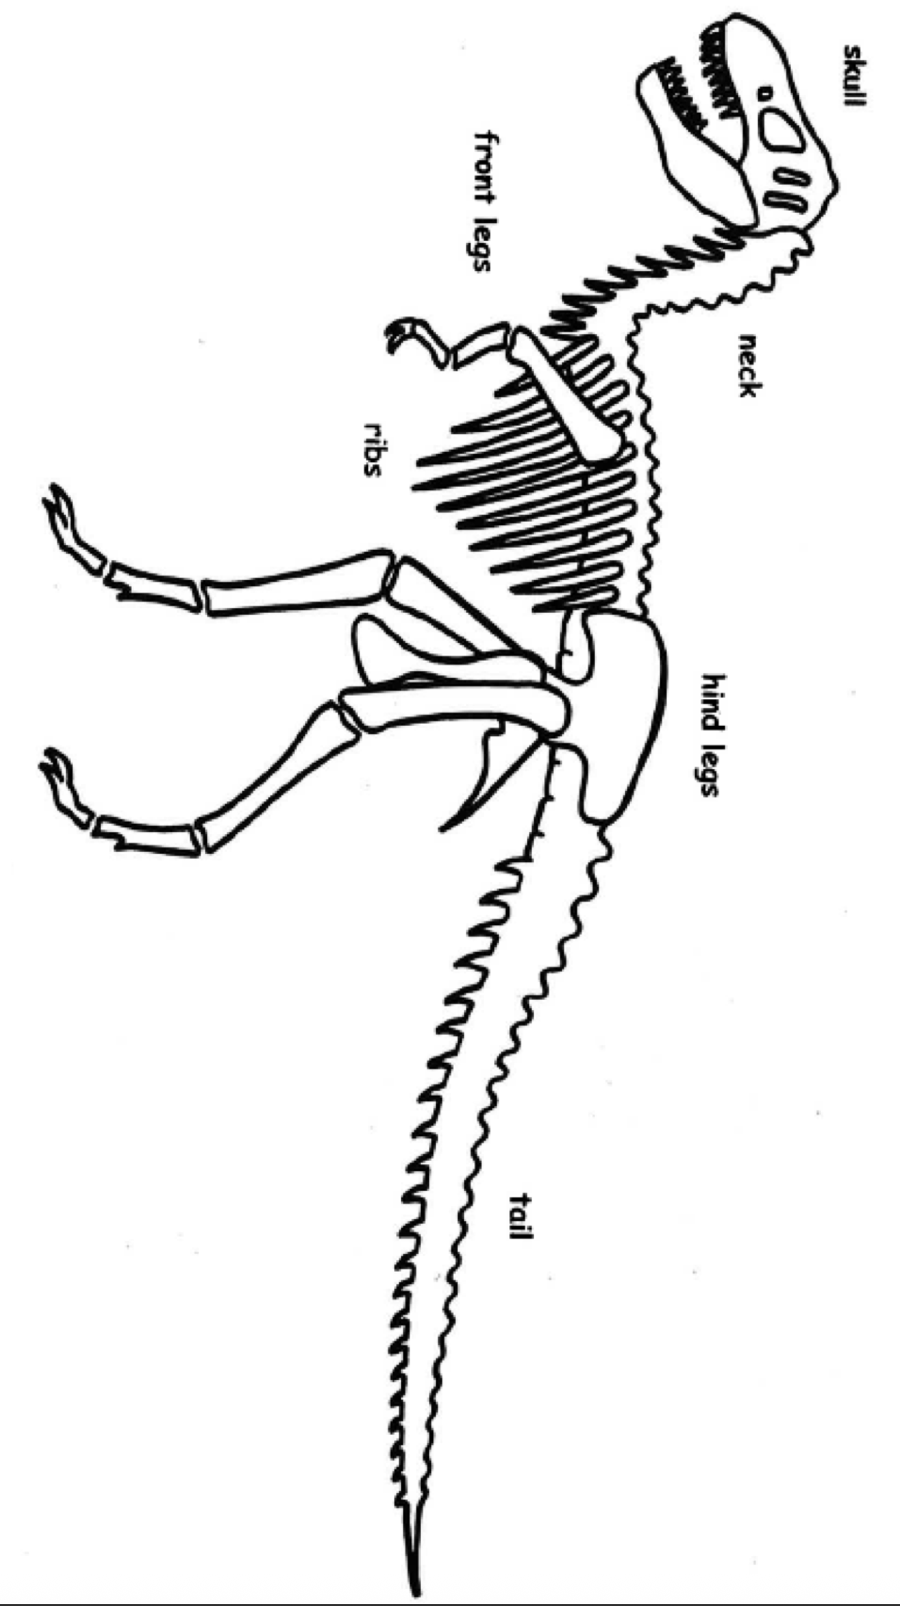
2. Animal skulls
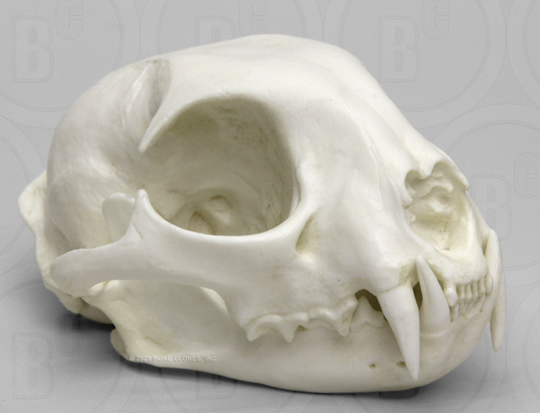
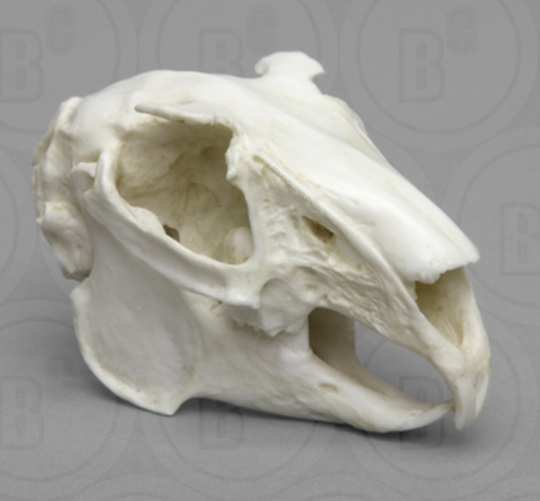
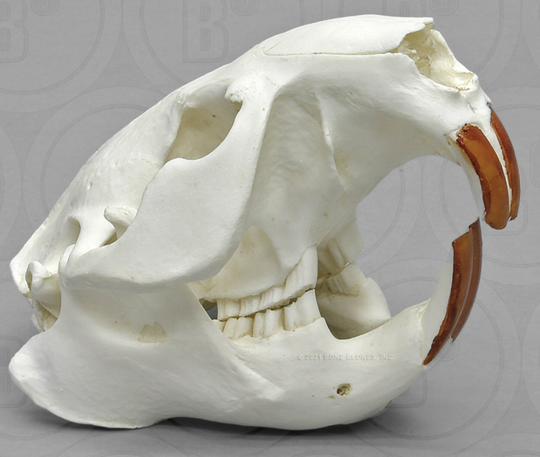
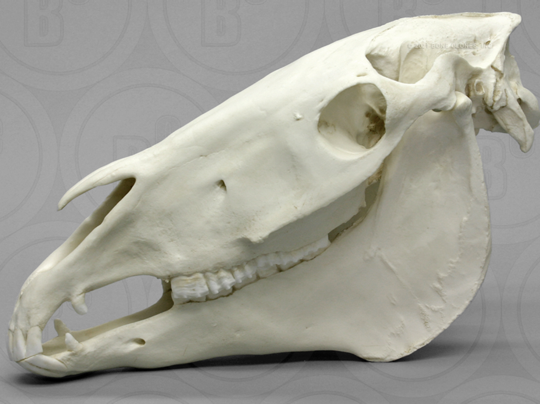
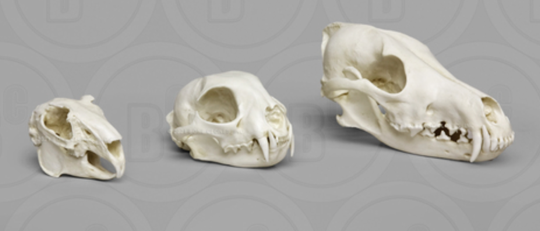
Animal skulls. Show three animal skulls to the students and ask them to list the properties of the skull. Have them give observations and inferences. Use skulls from an herbivore, carnivore, omnivore. and have learners focus on types and placement of teeth, eye sockets, and other characteristics of the skulls. Ask. How does this activity relate to what archaeologists do with dinosaur bones?
Skull samples. You can purchase samples or often borrow them from game and park departments.
Domestic cat - Source Bone Clones
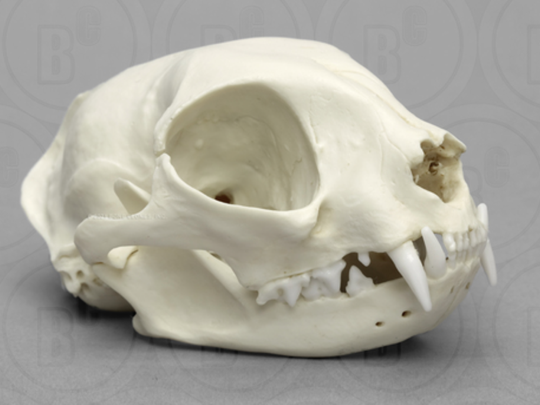
Bobcat - Source Bone Clones
Jackrabbit - Source Bone Clones
Beaver skull - Source Bone Clones
Mouse - Source Bone Clones
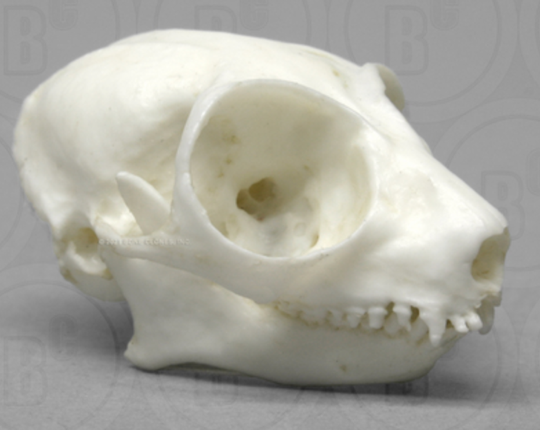
Horse - Source Bone Clones
Predator prey skulls - Source Bone Clones
Jackrabbit, Bobcat, Coyote
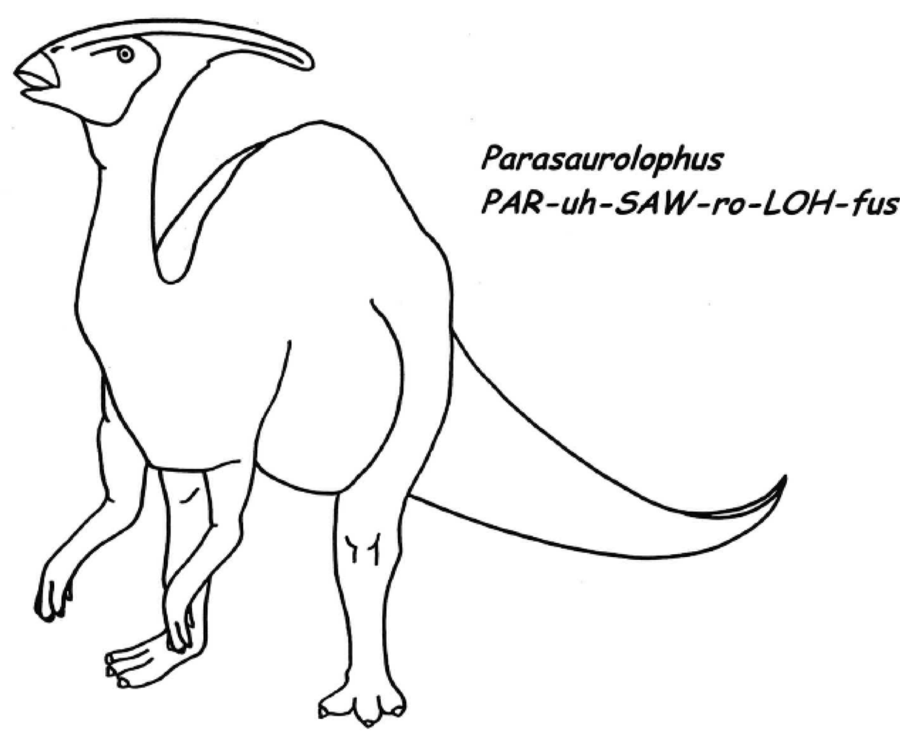
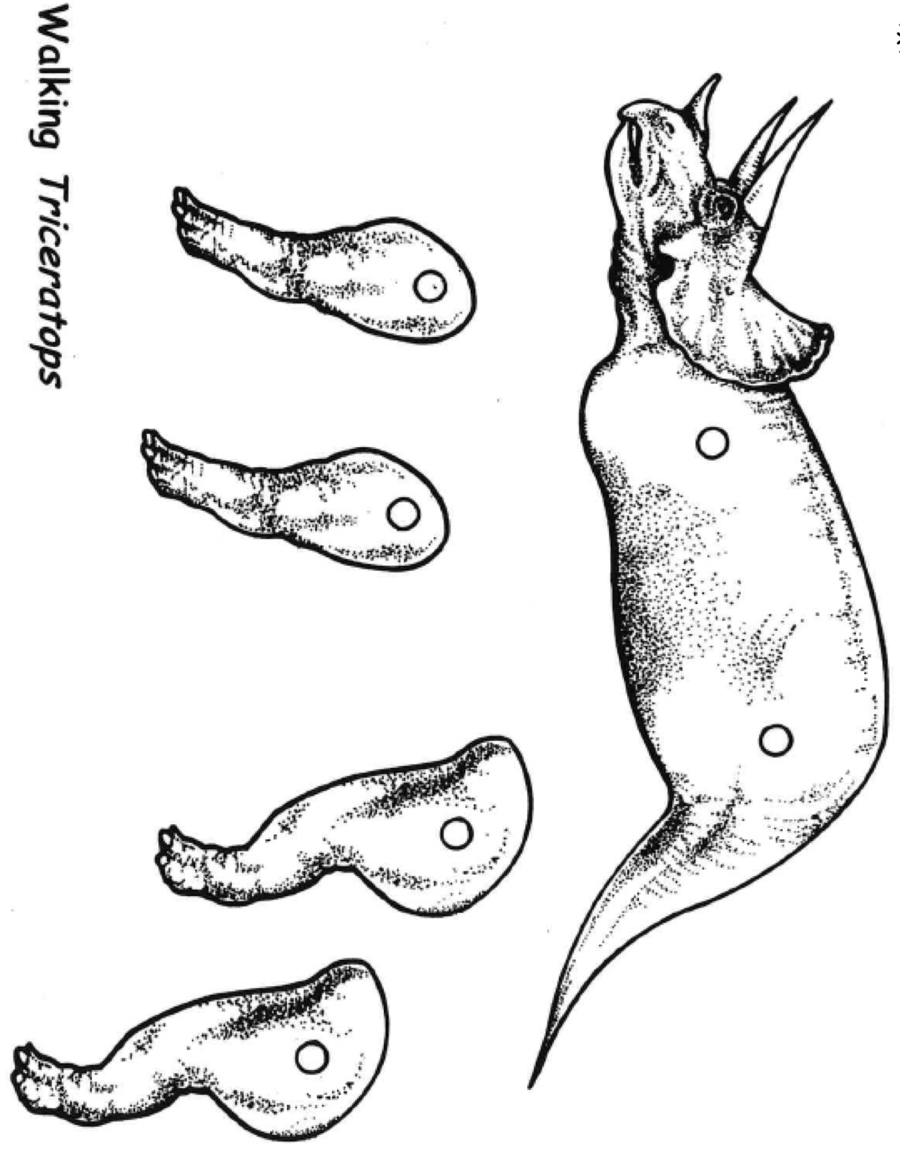
3. Build a dinosaur
Ask the learners to think about the shapes of dinosaurs. Then dinosaur body parts: Head, neck, body and legs, and tail.
Decide what materials you can provide (paper, oak tag, or cardboard) and demonstration, models or pictures or videos to show how to cut out, fold, and create dinosaur's bodies, legs, tail, neck and head. Decide a range of sizes for the dinosaur models. Then tell them they should select a dinosaur (herbivore, carnivore, omnivore). and make it to scale within the range decided. Have them construct a dinosaur to share with the rest of the group.
When they finished have prepare a short presentation to explain how stable their animal would be and what kinds of limitations there would be for the form and function of their chosen body parts.
Then have a Dino walk and share session.
Activity ideas
Materials:
Paper, oak tag (card stock) or cardboard in various colors, scissors, glue, tape, markers, crayons, or other art supplies for decoration
Preparation:
Gather the materials and patterns to use to make the cut outs for the four body parts or demonstrate some construction techniques for various body parts and types.
- Bodies: Various shapes and sizes to represent different dinosaur body and leg types (long and slender for sauropods, short and stocky for theropods).
- Tails: Long and whip-like for diplodocus, short and club-like for ankylosaurus, or spiked for stegosaurus
- Necks: Long and slender for sauropods, short and thick for theropods
- Heads: Various shapes and sizes, with or without horns or spikes
Activity:
- Have learners suggest and demonstrate how to fold and roll card stock to make different shapes for different body parts. Roll for cylinder shapes, crooked roll to make cone shapes, pillow shape, ... And how to join different shapes together. Folding in half or thirds to create a 3D effect, and suggestions on how to connect the parts.
- Share resources about dinosaur body types.
Example Dinosaur Types:- Sauropods: Long slender necks, long tails, large bodies (e.g., Diplodocus, Brachiosaurus)
- Theropods: Bipedal, short stocky, carnivorous dinosaurs (e.g., Tyrannosaurus Rex, Velociraptor)
- Ankylosaurus: Armored dinosaurs with a long clubbed tail
- Stegosaurus: Dinosaurs with plates on their back and spikes on their tail.
- Triceratops: Horned dinosaurs with a bony frill.
- Distribute materials and encourage the learners to assemble their own dinosaurs by making and connecting a body, tail, neck, and head.
- Decoration: Allow students to decorate their dinosaurs with markers, crayons, or other art supplies.
- After they complete their Dino. Have them display them for all to see.
- Have a dinosaur walk. Where each creator describes their dinosaur and explains why they picked the shape for each of the four body parts: head, neck, body & legs, and tail. Any limitations and how the form relates to the function.
Dinosaur pics


Source - MW Craft studio
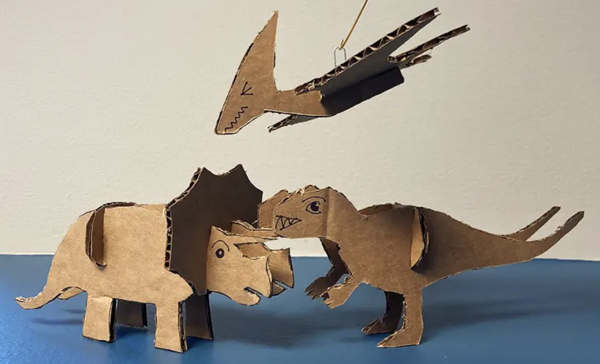
Source - Science Museum of Minnesota
4. Bone size comparisons
To explore bone size and weight-bearing capacity, show an animal leg bone to the learners. Ask them to estimate its weight-bearing capacity and explain their method. Provide a data sheet and scale for comparison.
- Introduction:
- Show the bone: Display a leg bone (e.g., femur or tibia) from an animal to the learners.
- Ask. How much weight do you think this bone could support?
- How would you know?
- Understanding Weight-Bearing Capacity:
- Discuss factors: Include bone density, size, shape, and the animal's type.
- Relate to daily life: Ask students to think about how their bones support weight and movement.
- Data Sheet and Scale:
- Provide a data sheet:
- Create a sheet with a scale or graph for recording bone dimensions and estimating weight-bearing capacity.
- Compare and contrast: Have students find the bone's position on the scale, comparing it to other bones or animal sizes.
- Example: Use a scale with different animal types and their estimated weight-bearing capacity.
- Exploring Relationships:
- Ask questions: Encourage students to think about the relationship between bone size, weight, and animal size.
- Examples:
- Do larger animals need larger bones?
- How does bone shape affect weight support?
- Can you think of animals with very strong or light bones?
- Suggest further research: Encourage students to research different animals and their bone structures.
- Extension Activities:
- Compare different bones
- Provide students with animal bones and encourage them to compare their structures and weight-bearing capacities.
- Have them construct models illustrating the correlation between bone size and body size. Research bone density and explain its significance in determining bone strength.
Bone structures
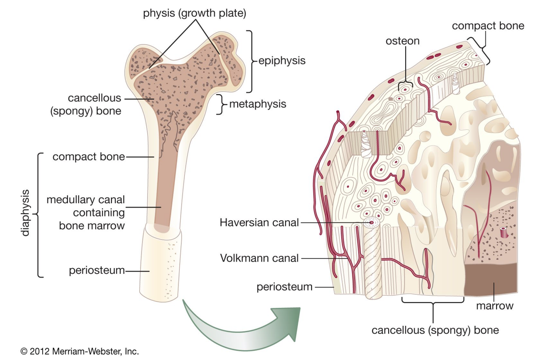
Bone characteristics for different species
| Species | Bone Density | Bone Size | Bone Shape | Bone Type Sampled |
|---|---|---|---|---|
| Giraffe | Not specified | Long, slender | Slightly greater diameter, thicker walls | Limb bones |
| Buffalo | Not specified | Large | Robust, strong | Limb bones |
| Cow | Not specified | Large | Thick, robust | Limb bones |
| Horse | High | Long, strong | Dense cortical bone, optimized for speed | Limb bones |
| Pig | Similar to humans | Medium | Compact structure | Not specified |
| Human | Similar to pigs | Medium | Varied, adapted for bipedal locomotion | Various |
| Mouse | Low | Small | Light, thin trabeculae | Limb bones |
| Dinosaur | Variable (species-dependent) | Large to massive | Strong trabecular structure for support | Limb bones |
Definitions
- Bone volume fraction (BV/TV) is calculated by dividing the total volume of mineralized bone (BV) by the total volume of the sample (TV).
- Trabecular bone, also known as cancellous or spongy bone, is a porous, inner bone tissue structure characterized by a network of interconnected plates and rods (trabeculae) that reduces bone weight and facilitates efficient force transmission.
Summary
- The trabecular bone structure in the femora of various species scales with body mass, affecting bone geometry and mechanical properties.
- In mammals, as body mass increases, bone volume fraction and trabecular thickness increase, while trabecular number and connectivity density decrease.
- In birds, bone volume fraction and trabecular thickness also increase with body mass, but trabecular number and connectivity density decrease.
- In dinosaurs, bone volume fraction, trabecular number, and connectivity density increase with body mass, while trabecular spacing decreases. These scaling relationships are crucial for understanding how bone structure adapts to mechanical demands across species.
5. Today's reptile foot prints
Using a present day reptile to model the size of a prehistoric reptile (dinosaur) footprint preserved in time.
Download a footprint image from the U.S. National ____ Park. Make a footprint from an iguana use the iguana footprint and measure the iguana. Relate the proportions of the iguana’s body to the footprint of the extinct dinosaur and use string or yarn to show the size of the prehistoric reptile.
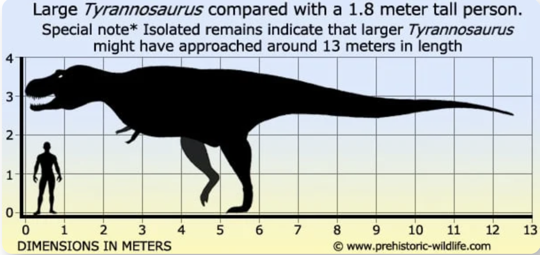
- A tyrannosaurus footprint is 1.8 m wide by 1.8 m long.
- It is 3 -6 meters height and 13 - 14 meters long.
- Its weight 9 tons or 8,200 kg.
Can use a model to create a paper footprint.

Iguana footprint
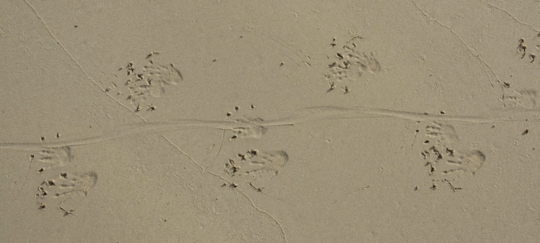
Iguana footprints are distinct, showing five-toed prints with a line from their straight tail dragging the ground, and their size varies depending on the iguana's size, which can be from 4 to 6.4 feet long.